Translate

Wednesday, July 15, 2026

Outside Processing Setups and Cycle in Oracle EBS R12

 OSP Cycle


This post is about Oracle Outside Processing Cycle. Outside processing is used when we don't have in house resources to complete a particular operations. In these cases we send material or assembly for outside processing. In other words we leverage the capacity and specialized skills of our suppliers for the work which we can not perform efficiently in house.

Normally company purchase raw material and perform few operations and then send material outside. we will follow the same example

Setup Steps
1) Create Items : FG1 (Finished Good, Its the main item being manufactured),  RAW1 (Raw Material), OSP1 (Outside processing)
2) Resource Creation : OSPRes1 (OSP Resource)
3) Department Creation : OSP_DEP1  (OSP Department and Assign Resource to Department
4) Define Routings
5) Define BOM

Step 1) First thing is to define Items

Lets define three items FG1, RAW1, OSP1

# FG1 > please use Finished Good Template


# RAW1 > Its a purchased item so use purchasing template.


# OSP1> Its outside processing item therefore use Outside Processing template


In purchasing tab make sure to tick Purchased, Purchasable, Outside processing Item and enter a value in list price. If list price not entered then the cycle will fail at the time of importing the requisitions.


Outside processing Item unit type can be Assembly or Resource

If its assembly and resource basis is item then system will create 1 qty in the requisition for each assembly and if resource basis is lot then system will create 1 qty for Job.

Similarly if you want usage as rate or amount the use resource and like you are buying 1 hour of cutting or painting.

For our case we will take it as assembly

Step 2) Resource Creation

Navigate to Bill of Material responsibility>Routing>Resource


Define OSPRes1 as resource type as Miscellaneous and UOM as HR.

Charge Type take as PO move ( PO receipt automatically generates the WIP Move transaction from the outside processing operation to the next operation on the routing. If PO receipt then you need to manually move to next operation) and basis Item.

In outside Processing region enter our OSP1 Item.

Step 3) Department Creation

Create an OSP Department (OSP_DEP1). Make sure to assign it a location (This is the delivery location used in PO), otherwise you may get an error w

while importing the requisitions


Click On Resources button and assign the resource created in step 2


Step 4) Define Routing


Enter Finished good item in header and In main tab put departments. Click on operation resources and enter the operation resource created in step 2 for OSP_DEP1


Save it

Step 5) Create BOM


Enter Item and components as shown in screenshot above. Save your work

Test case

Now Lets test this setups by Create a job and releasing it. Then import requisition >auto create PO > Receiving

Make sure to Misc receive Raw1 material before starting this

Step 1) Create a Job and release it for this Finished good FG1.  Navigate to WIP responsibility>Discrete>Discrete Job


Change Status To Releases and then Save it

Step 2) Navigate to Move transaction window and enter your job umber in Job field


Seq of Operation is from 10 to 20 and qty as 5. Save it

this will insert data in PO_requisitions_interface_all table and then you need to import the requisition

Step 3) Import Requisition

Switch to PO responsibility and run Requisition Import program


Click OK and submit the request. Make sure request completes and in the output you get a message that Number of approved requisitions created = 1

Some time this request fires automatically base don your setting in WIP Parameters.

If this process fails to create any requisition or error out run PO requisition except report to find out the error.

Step 4) Auto create the PO from the requisitions

Check the requisition in the Requisition summary by putting OSP1 item in item tab and auto create this requisition to PO and then approve it.


Now receive this PO. Here you can see Destination type will be Shop floor and location is same as department's location.


Step 5) Now check the WIP move pending transaction.

When the receipt is made, Purchasing triggered a Move transaction by inserting a record into the
WIP_MOVE_TXN_INTERFACE table. This record is waiting to be processed by the Move Transaction Interface manager. You can check them in pending move transaction table.


This Transaction is automatically processed. Now navigate to Jobs>Operations

You can see in screenshot below there are 5 qty To Move. So we need to perform completion transaction.
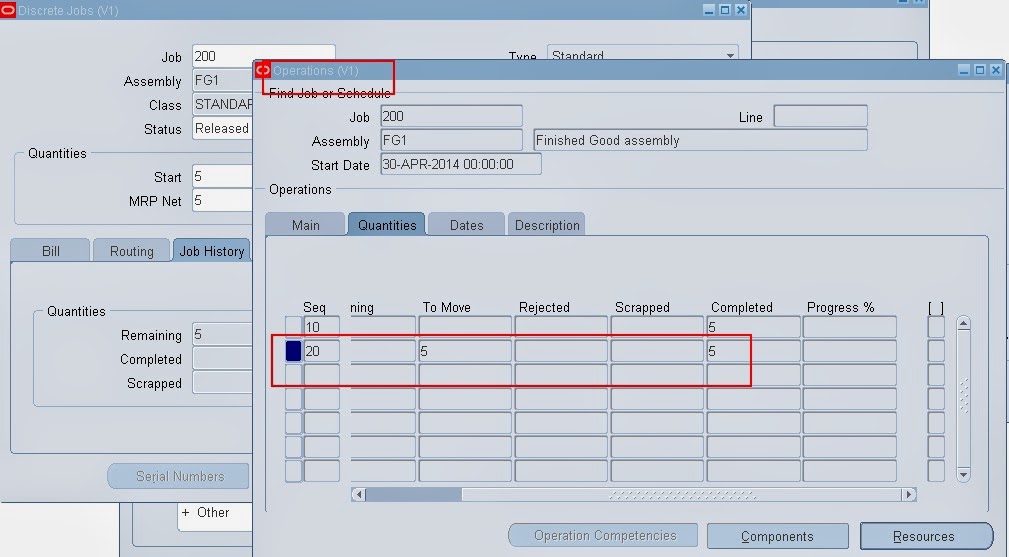


Step 6) As OSP is the last step in the routing, so we have to do completion transaction.


Click on Continue


Enter completion subinventory and qty and click Done


Now check the WIP job, you can see the completed qty is 5 and onhand has increased

Thanks
Mandeep
------------------------------------------------------------------------------------------------------------------------------------------------------------------
Please share this knowledge with your friends and subscribe at our blog for more updates. If you have any queries, please participate in our Forum or by leaving your comments below.
-----------------------------------------------------------------------------------------------------------------------------------------------

Saturday, June 27, 2026

Oracle Order Management Setup Document in Oracle EBS R12.2


Oracle Order Management Setup Document in R12.2


Definition:
  • Oracle Order management is one of the most important part of the oracle EBS. The Order Management Application provides many flexible features enabling you to set up your system to begin processing different types of sales order.
  • In this document we are going to see the basic setups of Order management in Oracle EBS R12.
  • Few of the information that is required while setting up Oracle Order Management is shared through other modules like System Administrator for enabling profile options, Oracle Pricing Manager for Price List setup.
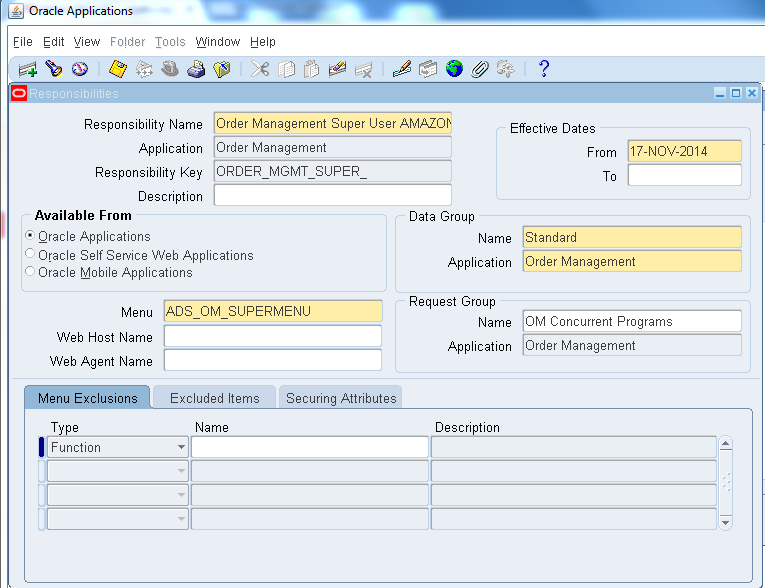
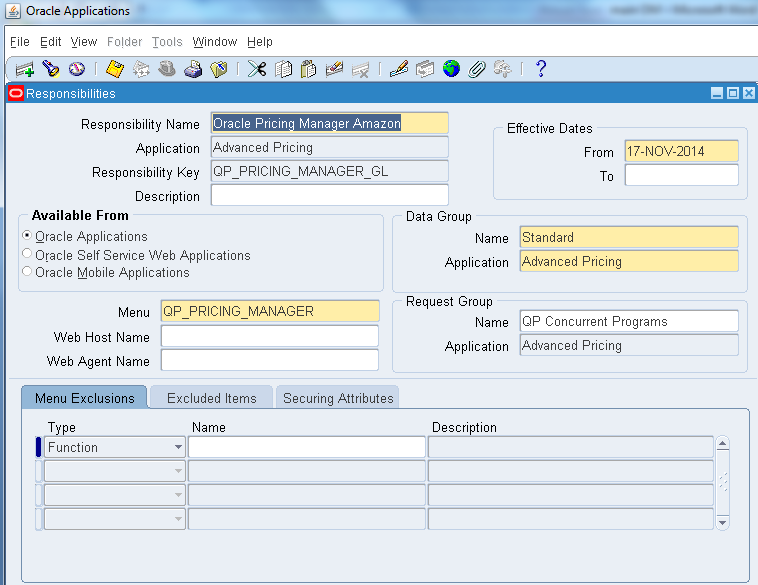
  • Firstly let’s add the Order Management  Super User Responsibility to the User

Invoking: System Administrator→Security→Responsibility→Define


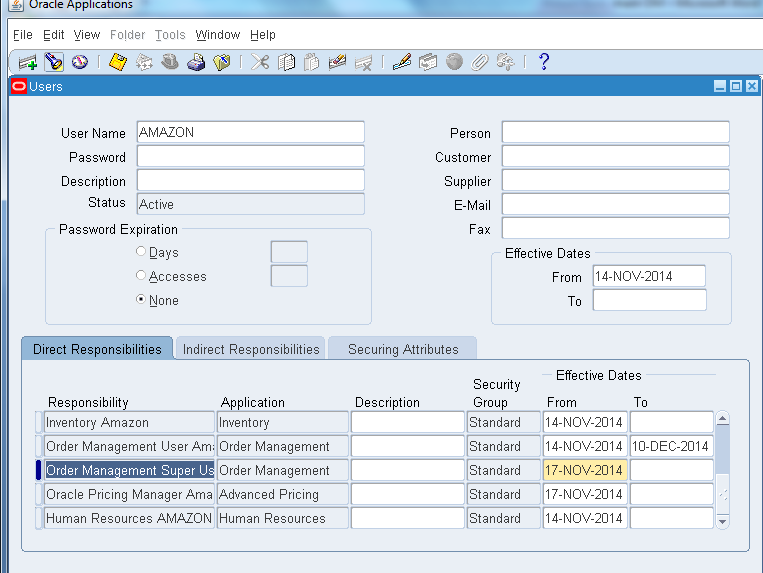
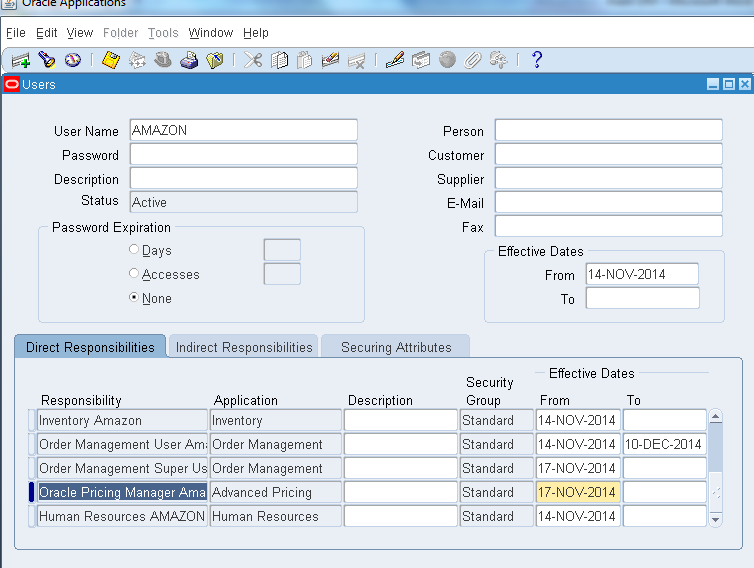
  • Now let’s add the responsibility to the user
Invoking : System Administrator→Security→User→Define


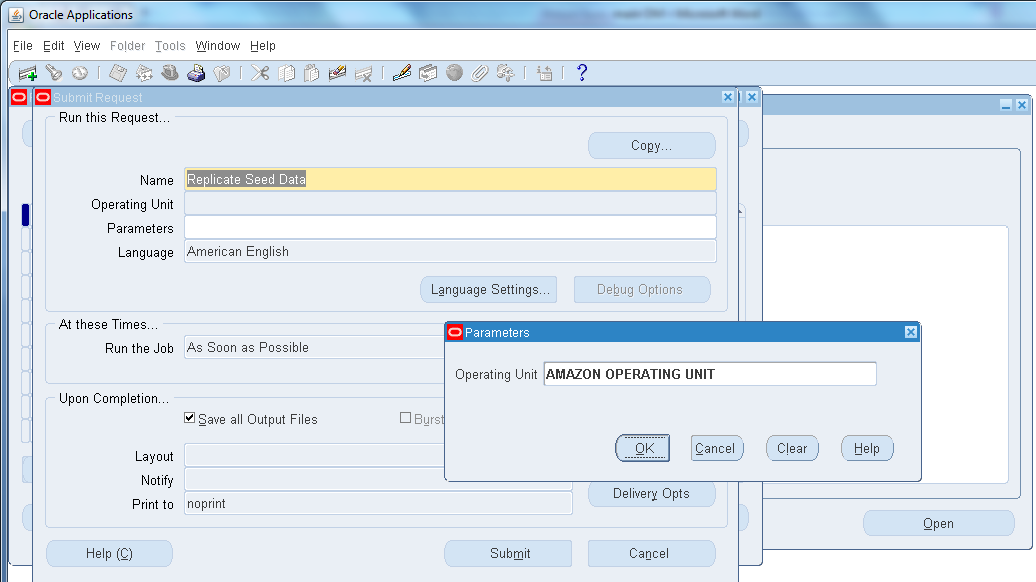
  • Run replicate seed data as below
Invoking: System Administrator→View→Request→Submit New Request

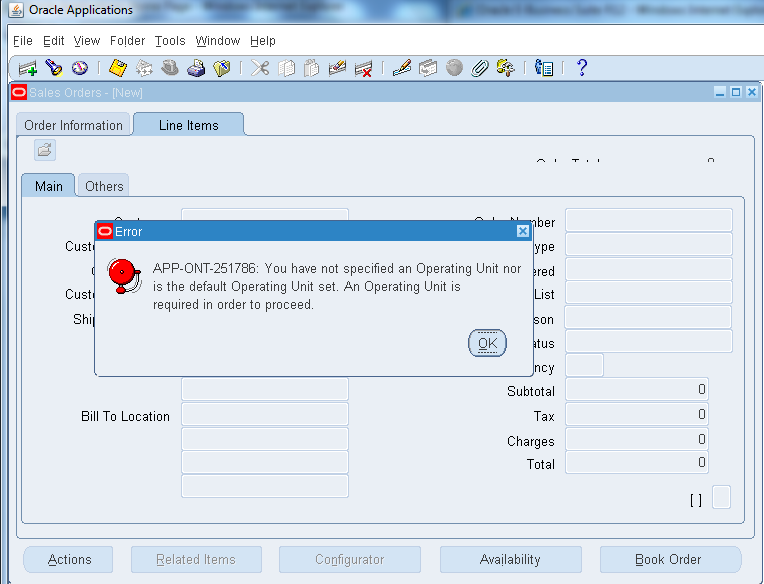
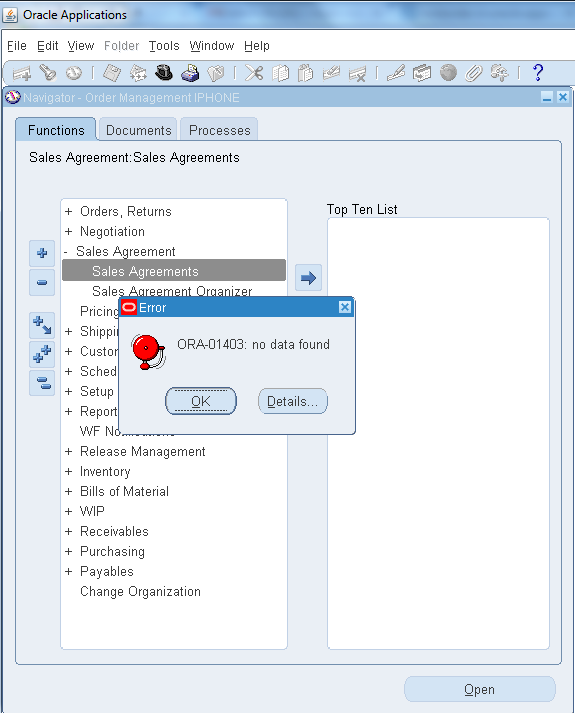
  • Now if switch the responsibility to order management and try to invoke Sales Order or Sales Agreement it won’t allow us to process, it will prompt an error as below.

Order Management→Orders, Returns→Sales Orders
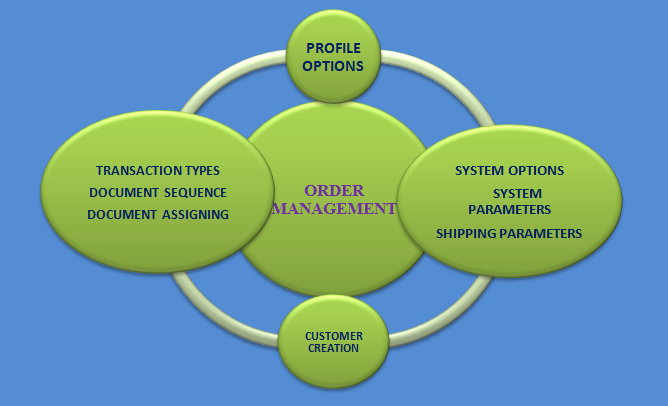
  • In order to enable these functionalities we have to follow mandatory setups as below.
Prerequisites:
  • Profile Options
  • System Options
  • System Parameters
  • Shipping Parameters
  • Transaction Types
  • Document Sequence / Assignment
  • Price List
  • Customers


  • STEP 1: PROFILE OPTIONS

    • For any module profile options is a mandatory setup which has to be followed.
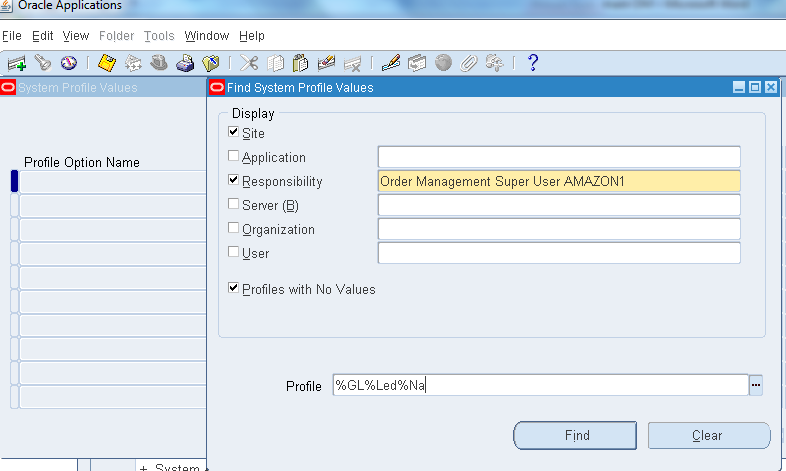
    Invoking: System Adminitrator→Profile→System

    In Profile field enter these features:
    • %GL%Led%NA%
    • %HR%User%, %HR%Sec%, %HR%Bus%
    • %MO%Oper%Unit%,  %MO%Defaul %, %MO%Sec%

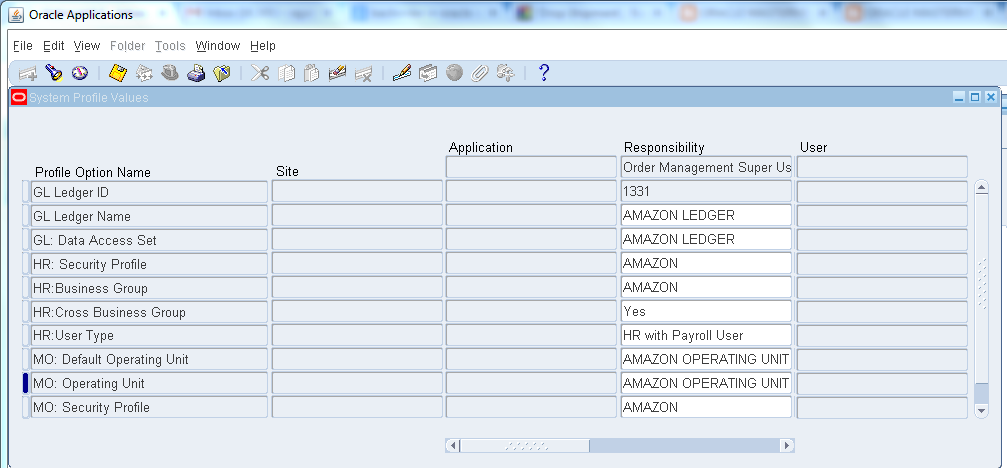
    • So that the final output will appear as below.

    STEP 2: SYSTEM PARAMETERS
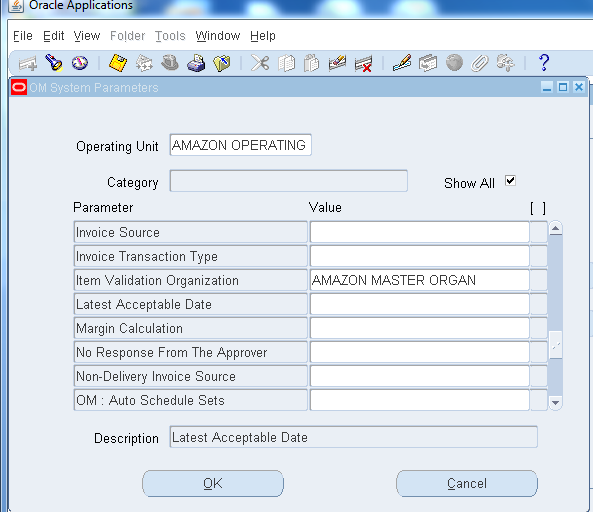
    • We have to enable our Inventory in Item validation Organization
    Invoking: Order Management→Setup→Shipping Parameters→Define
    • Query for Item validation Organization and provide the inventory organization you prefer to connect and save the form.

    STEP 3: SHIPPING PARAMETER
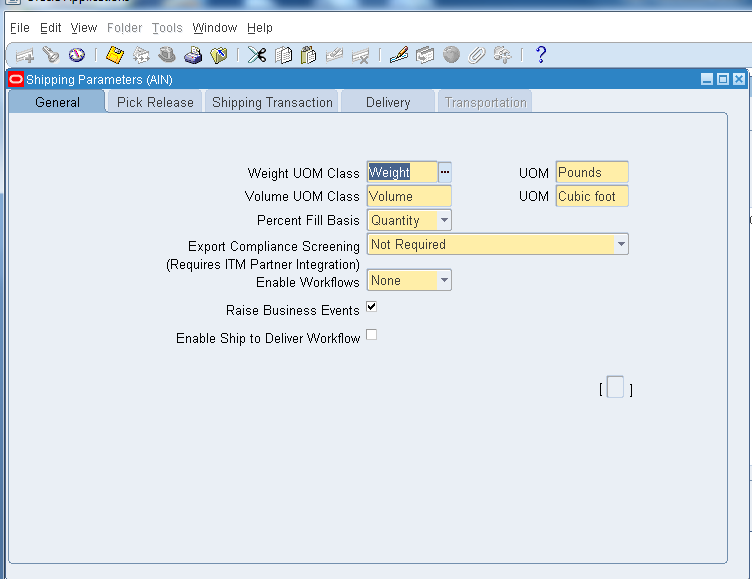
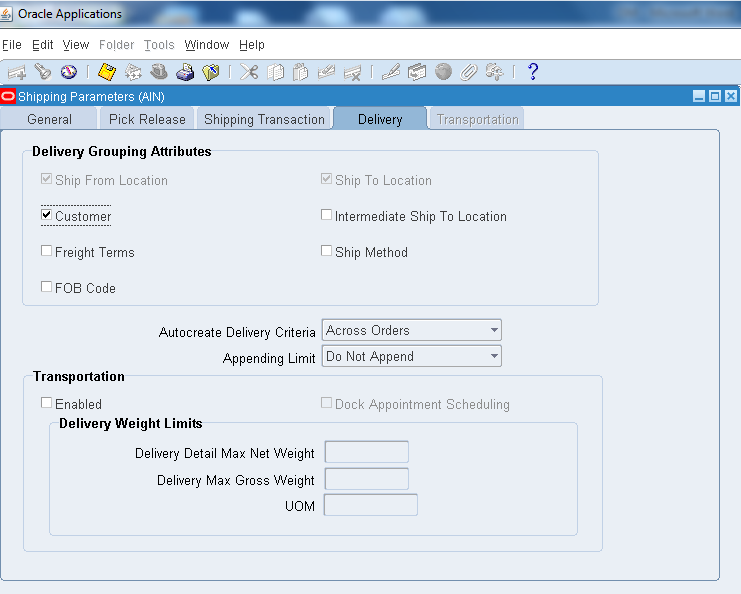
    Invoking: Order Management→Setup→Shipping→Shipping Parameters
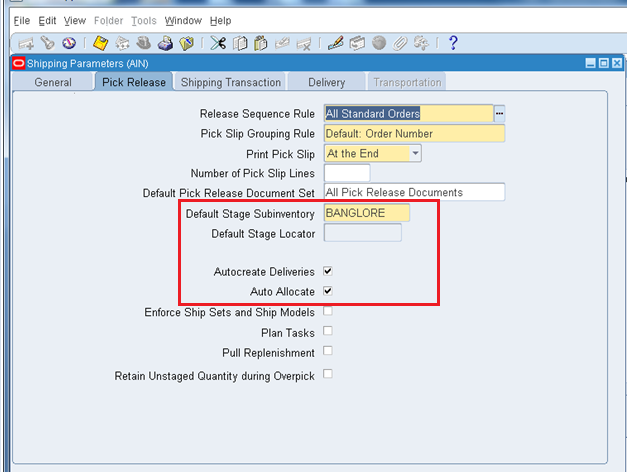
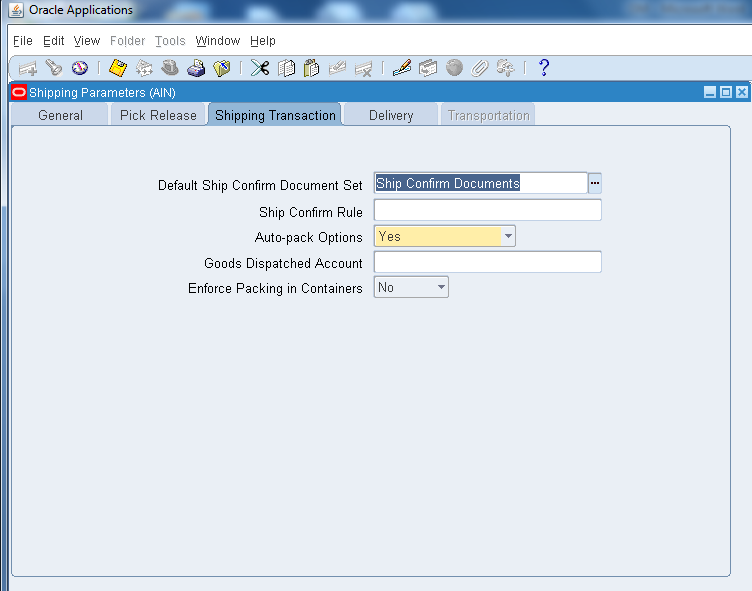
    • Provide the details as below for corresponding tabs in Shipping Parameters
    • Here in below dialog box, the sub inventory is BANGLORE so that it will be the default staging for the goods.


    Auto create Deliveries
    • What happens if selected?
    Pick release automatically creates deliveries based on the delivery grouping rules and assigns delivery lines to them. When pick releasing, the Auto create Deliveries check box in the pick release form defaults to this parameter setting if you enter a warehouse. If you do not enter a warehouse, pick release uses this parameter setting from the organization of the warehouse on each sales order line.

    • What happens if Cleared?
    Pick release does not automatically create deliveries.

    Auto Allocate check boxes
    • What happens if Selected?
    Pick release creates move orders and automatically allocates them.

    • What happens if Cleared?
    Pick release creates move orders. You must manually allocate the order lines using the Inventory Transact Move Orders window.


    • Save and close the form above.

    STEP 4: SYSTEM OPTIONS
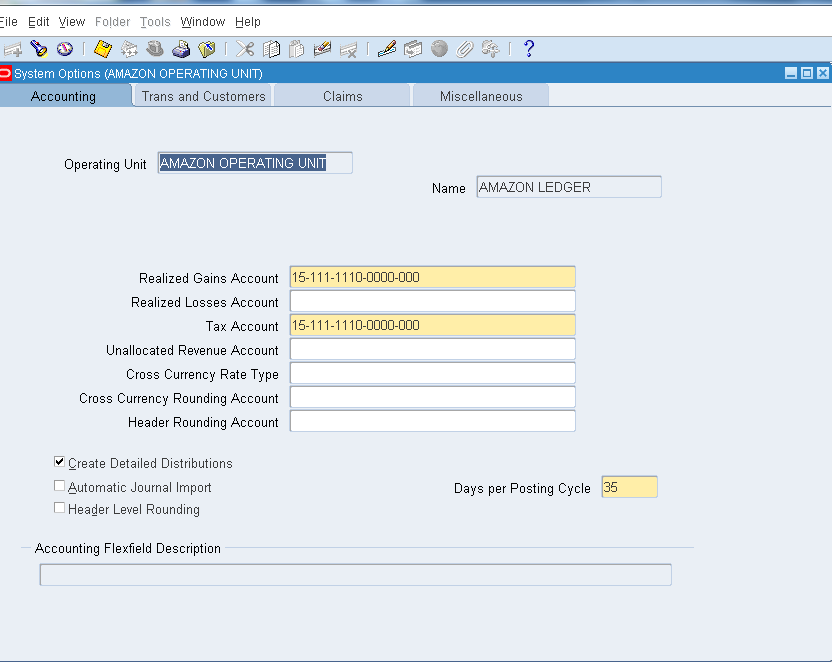
    • Here we are going to connect general Ledger and Operating Unit.
    Invoking: Order Management→Setup→Customers→System Options

    • If we have single operating unit it will show as default as below, if multiple please select any one of your choice.
    • In case the Operating Unit doesn’t show up, indicates that there is the problem with your multiorg.
    • Check completely the multiorg setups to solve it.
    • Provide the general ledger name in NAME field and account details in the account fields respectively.


    STEP 5: TRANSACTION TYPES
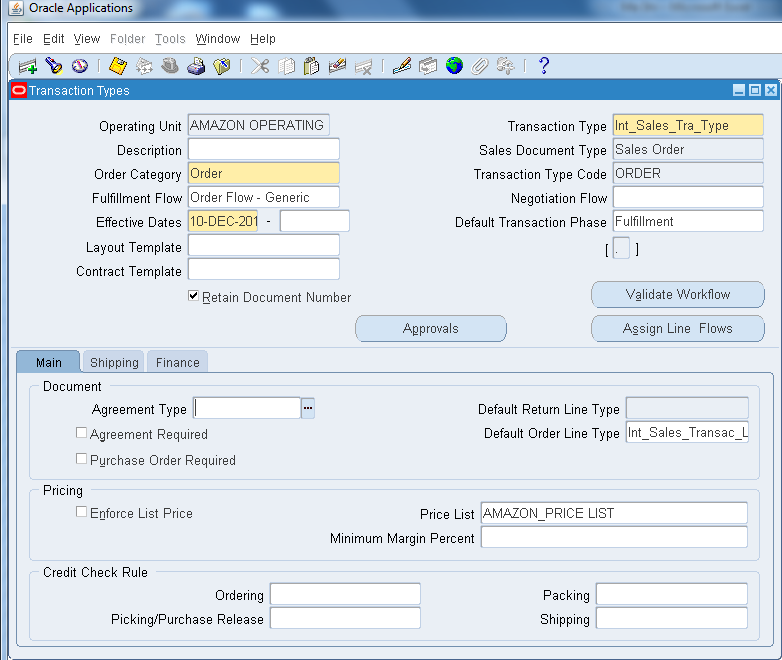
    • Lets create a new Transaction type which are used to associate workflows for various phases of sales order processing.
    Invoking: Order Management→Setup→Transation Types→Define
    • Below dialog box appears.
    • Enter either Order or Return for the Order Category depending on whether your new line type is for sales lines or return lines.
    • The value Mixed is selected for order type which can contain both sales order and return lines.
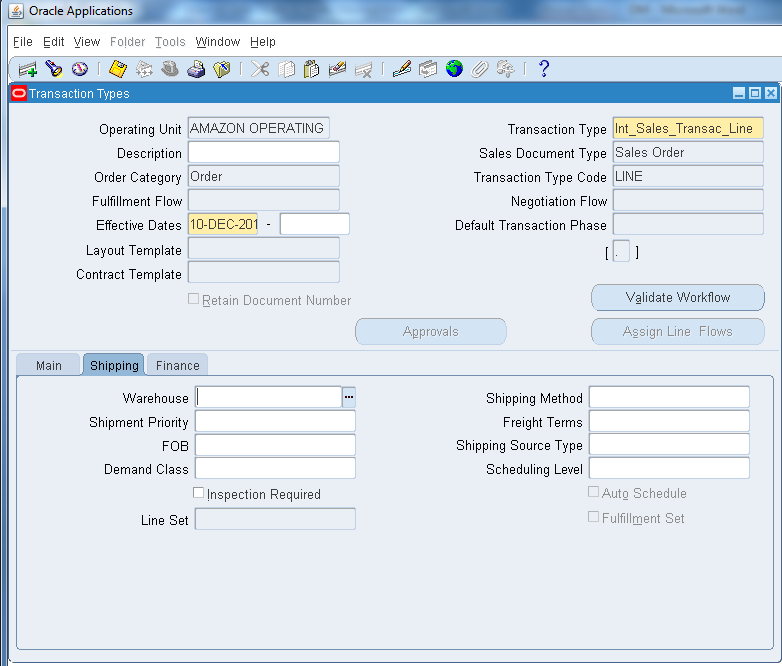
    • Let’s create a Transaction Line as order for understanding.


    And Transaction Type as below.
    • Order Category: Order
    • Sales Document Type: Sales Order
    • Transaction Type Code: ORDER
    • Fullfillment Flow: Order Flow – generic
    • Effective Date: Today
    • Default Transaction Phase : Fullfillment
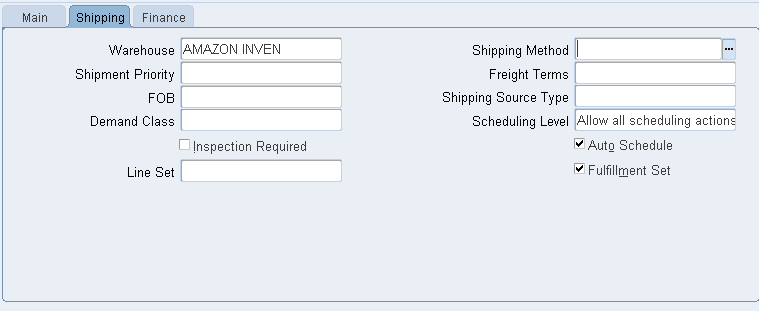
    • In shipping tab mention the below details as well.
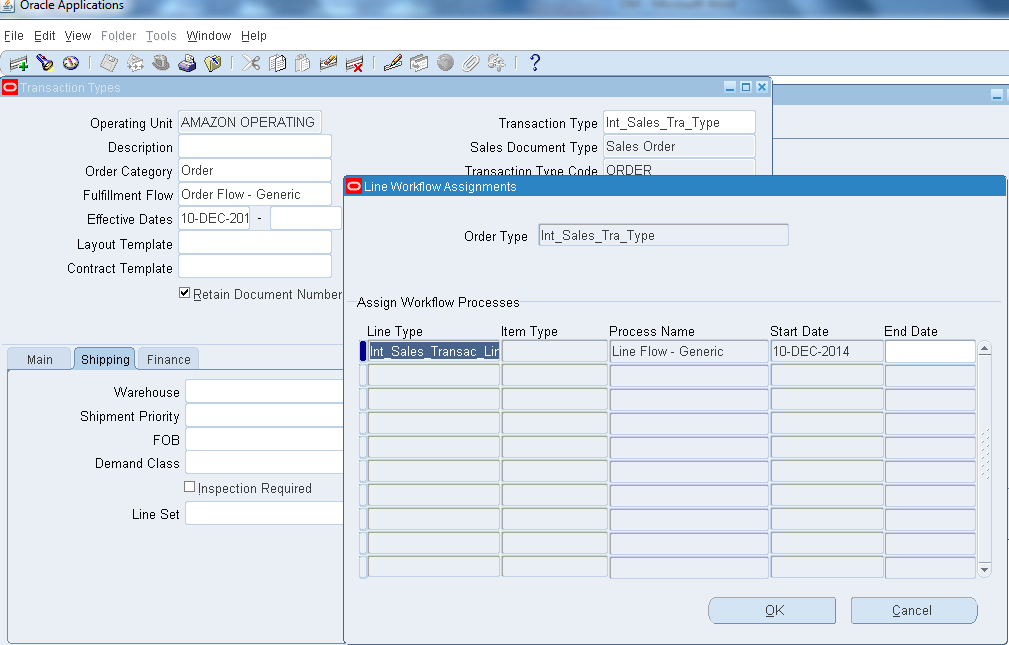
    • Click on assign line Flows
    • Line Type: Attach the Line created.
    • Process Names: Line Flow – Generic as below.
    • Click on Validate Workflows, a concurrent program runs on the background and save the dialog box.

    STEP 6: DOCUMENT SEQUENCE & ASSAIGING
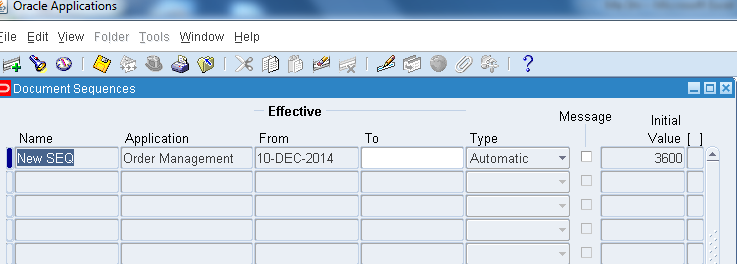
    • Let’s create a sequence for a document which will be followed for the sales order.
    Invoking: Order Management→Setup→Documents→Define
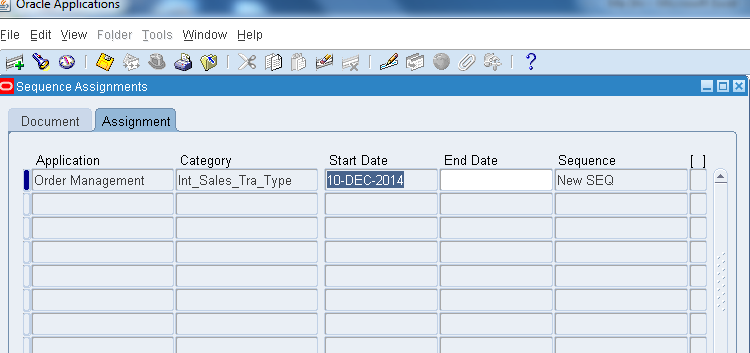
    Assigning:
    Invoking: Order Management→Setup→Documents→Assign
    • Mention the transaction type and sequence name we created.

    STEP 7: PRICE LIST
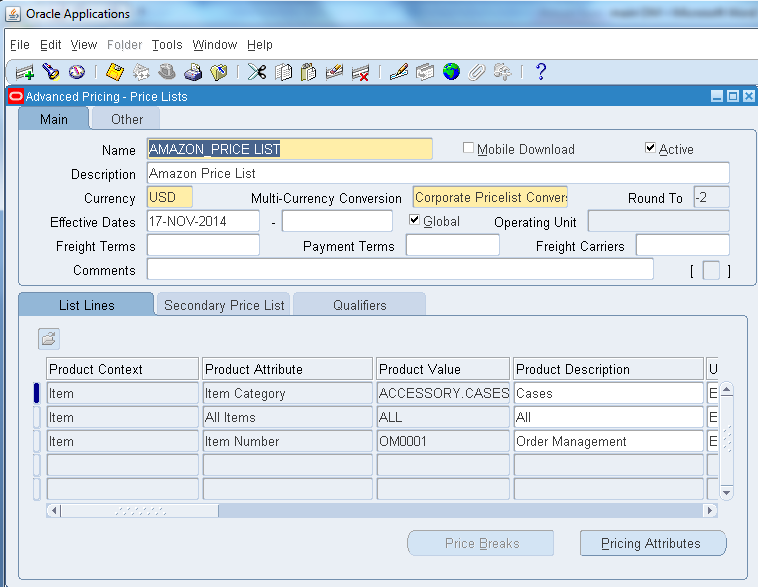
    • In oracle R12 in order to create a price list we have to add new responsibility called Oracle Pricing Manger, hence create a new responsibility from system administrator- security define and assign to the user as below.
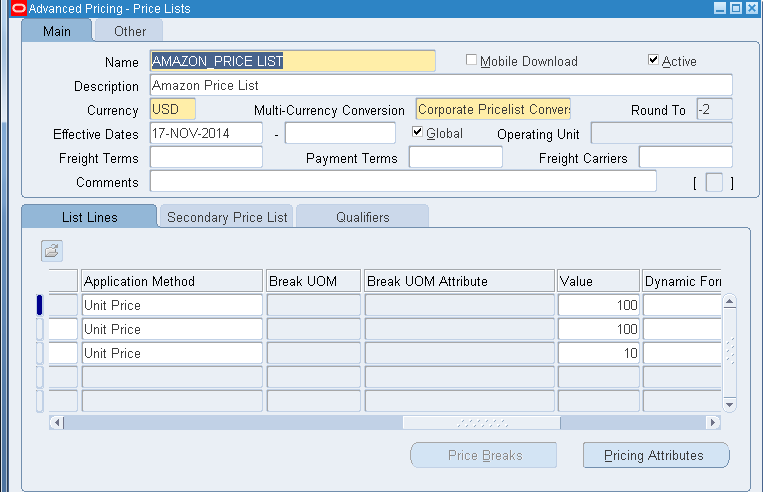
    • Now switch the responsibility to Oracle Pricing Manager→Price List→Price List Setup
    • Make sure the below Profile Options before creating the Price List
    Profile Options:
    QP: Pricing Transaction Entity = Order Fulfillment
    QP: Source System Code = Oracle Pricing
    • Here the product attribute feature updates the priority depending upon the Item Category, Item Number, All Items etc., depending on which the price will be taken.


    Save and close the dialog box.

    STEP 8: Creating CUSTOMERS
    • Lets create a customer for our sales order
    Order Management→Customers→Standard
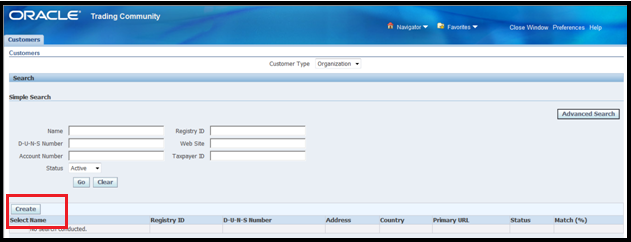
    • The below dialog box opens.
    • Click on the create button below.


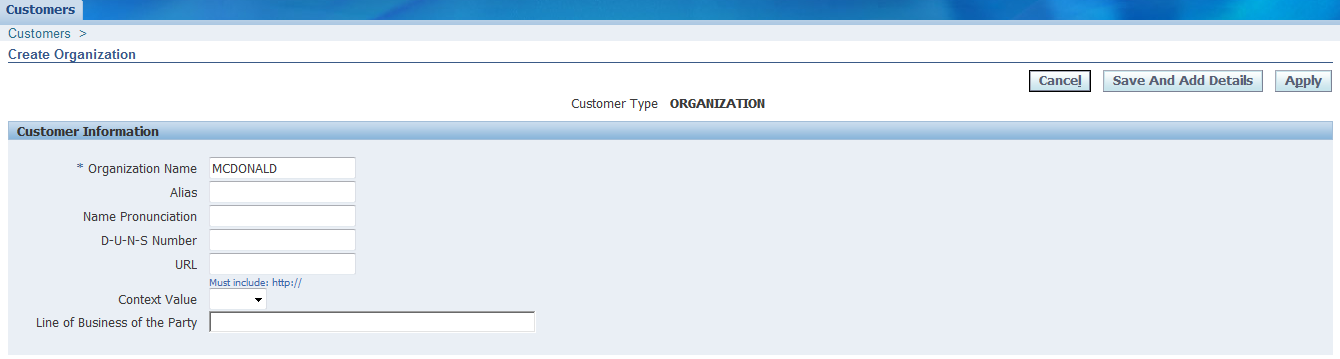
    • Name any organization of your choice.
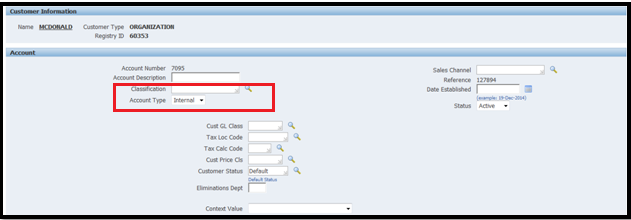
    • And account type as Internal.

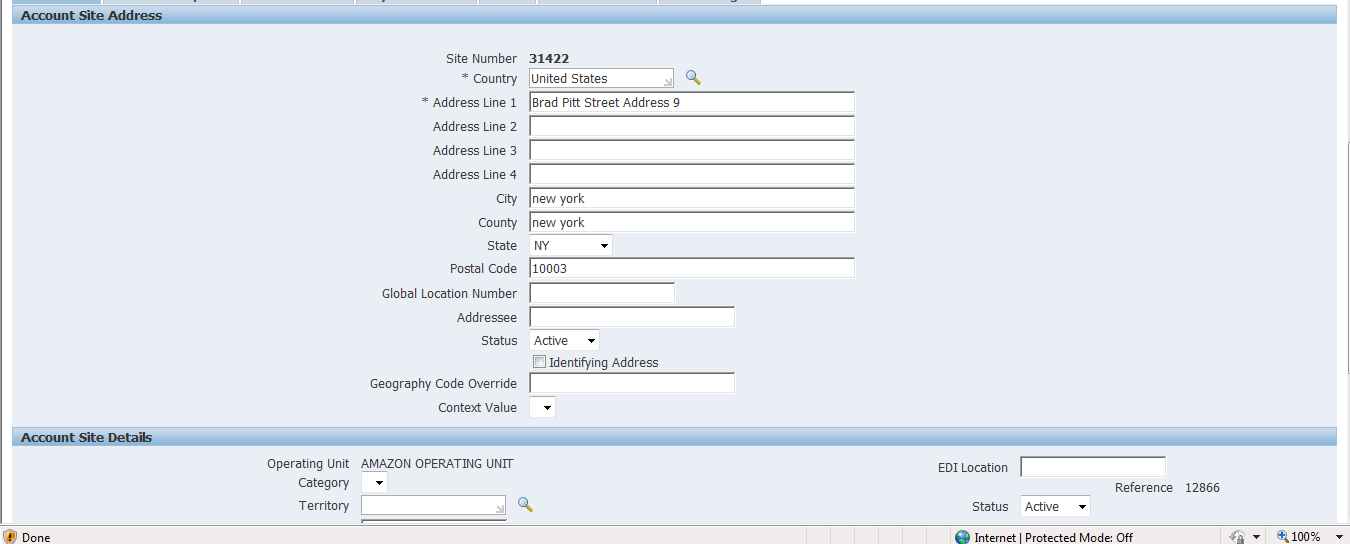
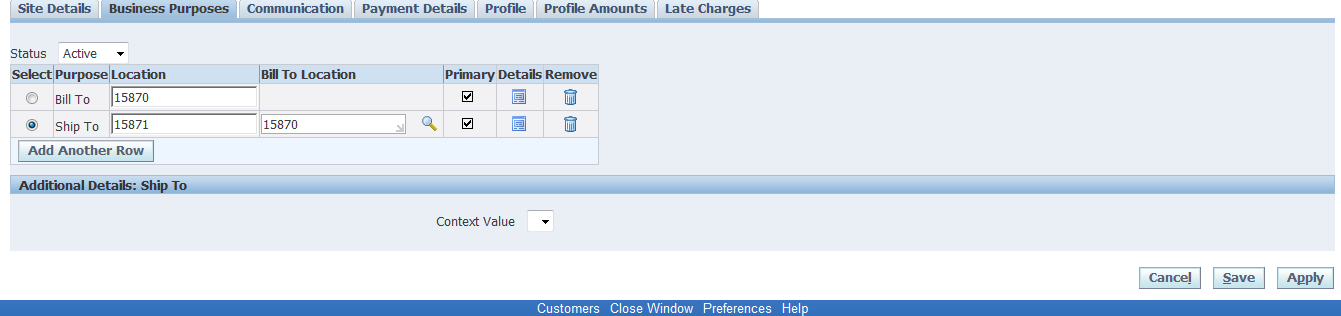
    • Provide a valid address as below.


    • Save the box and add the same address or any other for your Ship to address as well.
    • Click on apply which completes customer creation.
    • Now we are all set to go, open the sales order
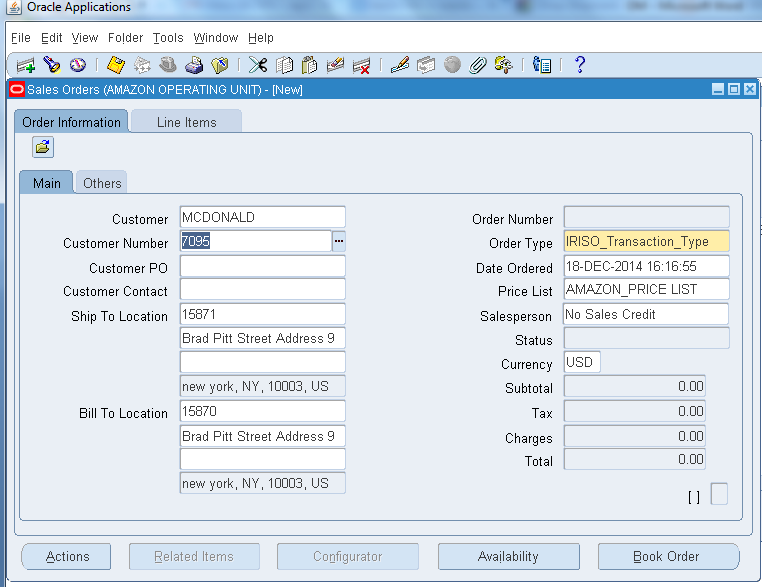
    Invoking: Order Management→Orders, Returns →Sales Order
    • The below screen will appear, from which you can book, release and ship confirm sales order.


    • The Oracle Order Management Application provides many flexible features enabling you to set up your system to begin processing order information.
    • This completes the setup procedure for Order Management

    Outside Processing Setups and Cycle in Oracle EBS R12

      OSP Cycle This post is about Oracle Outside Processing Cycle. Outside processing is used when we don't have in house resources to comp...