This article outlines the functionality and flow of information from Purchasing to Order Management to Shipping and Inventory during the life cycle from an Internal Requisition creation until the Internal Order is received into the destination organization.
The process of receiving against Internal Sales Orders involves the following steps:
1. Create an Internally Orderable Item
2. Setup Shipping Network
3. Create an Internal Requisition
4. Run Create Internal Orders concurrent program
5. Run Order Import concurrent program
6. Pick Release
7. Ship Confirm
8. Interface Trip Stop
9. Receive/Deliver the Shipment for the Internal Order
10. Recommended Patch List
11. Important Queries/Scripts for Internal Orders
Navigate to: Inventory/Items/Master Items.
· Create an Item.
· Under Inventory alternative region, check the boxes for Inventory Item, Stockable, Transactable.
· Under Purchasing alternative region, check the boxes for Purchased, Purchasable.
· Under Order Management alternative region, check the boxes for Internal Ordered, Internal Orders Enabled, OE Transactable
and Shippable.
Enable the item in Source and Destination Organization.
This information describes the relationships and accounting information that exists between a From (Source) Organization and a To (Destination) Organization.
Navigate to: Inventory/Setup/Organizations/Shipping Network
· Specify the From and To Organization.
· If you specify the Transfer Type as Intransit, then you need to explicitly receive using the Enter Receipts screen. It would
be a Standard Receipt.
· If you specify the Transfer Type as Direct, then goods will get directly shipped into inventory. It would be a Direct Delivery.
· Make sure to check the Internal Order Required checkbox.
ReceiptRouting can be Standard or Direct.
Create an Internal Requisition
Navigate to: Purchasing/Requisitions/Requisitions.
· Create an Internal Requisition using the item from Step 1.0
· Specify the quantity.
· Specify the Source and Destination Organizations. Source is on the right and Destination on the left in the overflow region.
· Save and Approve the Requisition.
Major Tables Impacted | Major Columns |
po_requisition_headers_all | SEGMENT1, REQUISITION_HEADER_ID,TRANSFERRED_TO_OE_FLAG,ORG_ID, AUTHORIZATION_STATUS, CANCEL_FLAG, CLOSED_CODE |
po_requisition_lines_all | REQUISITION_LINE_ID, DESTINATION_ORGANIZATION_ID, DESTINATION_SUBINVENTORY, SOURCE_ORGANIZATION_ID, SOURCE_SUBINVENTORY, DELIVER_TO_LOCATION_ID, ORG_ID, CANCEL_FLAG, CLOSED_CODE, QUANTITY,QUANTITY_CANCELLED, QUANTITY_DELIVERED, QUANTITY_RECEIVED |
TRANSFERRED_TO_OE_FLAG = 'N'
AUTHORIZATION_STATUS = 'APPROVED'
CANCEL_FLAG <> 'Y'
CLOSED_CODE <> 'FINALLY CLOSED'
Record is created in MTL_SUPPLY with SUPPLY_TYPE_CODE = 'REQ'.
Run Create Internal Orders concurrent program
Run the Create Internal Orders concurrent program. The Create Internal Orders process loads the OM open interface tables using the Order Type you define in the Purchasing Options window.
Run the foll. queries to confirm if the interface record got created:
SQL1> Select count(*) From oe_headers_iface_all
Where orig_sys_document_ref = <'Requisition Number from step 3.0'>;
SQL2> Select count(*) From oe_lines_iface_all
Where orig_sys_document_ref = <'Requisition Number from step 3.0'>;
Major Tables Impacted | Major Columns |
oe_headers_iface_all | ORDER_NUMBER, HEADER_ID, ORDER_TYPE, SHIP_FROM_ORG_ID, SHIP_TO_ORG_ID, BOOKED_FLAG, CANCELLED_FLAG, CLOSED_FLAG, STATUS_FLAG,ORIG_SYS_DOCUMENT_REF,DELIVER_TO_ORG_ID, ORG_ID |
oe_lines_iface_all | LINE_ID, SHIP_FROM_ORG_ID, SHIP_TO_ORG_ID, SHIPMENT_NUMBER, SHIPPED_QUANTITY, CLOSED_FLAG, DELIVER_TO_ORG_ID, ORG_ID,ORIG_SYS_DOCUMENT_REF |
BOOKED_FLAG = 'N'
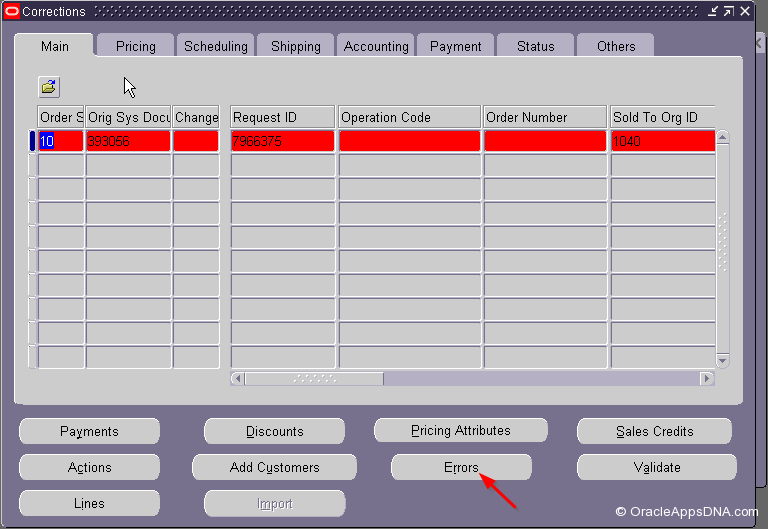
Navigate to: Order Management/Orders, Returns/Import Orders.
Run the Order Import concurrent program. Order Import creates Internal Sales Orders from the records in the interface tables and determines the order cycle and defaults values based on the order type. Note down the Order Number.
Run the foll. Sql to get the Order Number:
SQL1> Select order_number From oe_order_headers_all
Where orig_sys_document_ref = <'Requisition Number from step 3.0'>;
Check TRANSFERRED_TO_OE_FLAG = 'Y' in po_requisition_headers_all.
Major Tables Impacted | Major Columns |
oe_order_headers_all | ORDER_NUMBER, HEADER_ID, ORDER_TYPE_ID, SHIP_FROM_ORG_ID, SHIP_TO_ORG_ID, OPEN_FLAG, BOOKED_FLAG, CANCELLED_FLAG, FLOW_STATUS_CODE, DELIVER_TO_ORG_ID,ORIG_SYS_DOCUMENT_REF,ORG_ID |
oe_order_lines_all | LINE_ID, SHIP_FROM_ORG_ID, SHIP_TO_ORG_ID, SHIPMENT_NUMBER, SHIPPED_QUANTITY, OPEN_FLAG, BOOKED_FLAG, CANCELLED_FLAG, DELIVER_TO_ORG_ID,ORIG_SYS_DOCUMENT_REF,FLOW_STATUS_CODE,SHIPPING_INTERFACED_FLAG,ORG_ID |
BOOKED_FLAG = 'Y'
FLOW_STATUS_CODE = 'BOOKED'
SHIPPING_INTERFACED_FLAG = 'N'
Running Create Internal Orders and Order Import concurrent programs has no affect on MTL_SUPPLY.
By default the Create Internal Orders process populates the oe_actions_iface_all table with anOPERATION_CODE of 'BOOK_ORDER', causing the Order to be Booked by the Order Import process. So there is no need to Book the Order. If for whatever reason a hold gets placed on the Order at Booking, then after removing the hold the user would have to peform the actions Progress Order to move it to "Awaiting Shipping".
Pick Release finds and releases eligible delivery lines that meet the release criteria, and creates move orders. You can pick release by order, trip, stop, container, delivery, warehouse, customer, schedule, or requested dates, shipment priority or combinations of the above criteria. The default release criteria is set up in Shipping Parameters, but you can override the default criteria in the Release Sales Order window at pick release.
Major Tables Impacted | Major Columns |
wsh_delivery_details | OE_INTERFACED_FLAG, INV_INTERFACED_FLAG, ORGANIZATION_ID, RELEASED_STATUS, SHIP_FROM_LOCATION_ID, SHIP_TO_LOCATION_ID, SHIPPED_QUANTITY, DELIVERY_DETAIL_ID |
Your Order should be Pick Release Eligible.
RELEASED_STATUS: 'R' – Ready to Release
ORGANIZATION_ID is the Source Organization_id
Navigate to: Order Management/Shipping/Release Sales Orders/ Release Sales Orders
Enter Order Number and complete your entries in the Release Sales Order for Picking window or select a Based On Rule to automatically default the remaining criteria.
Under Shipping tab region, make sure Autocreate Delivery is Yes. It will automatically create theDelivery.
Under Inventory tab region, make sure Auto Pick Confirm is Yes. It will make the line Staged/Pick Confirmed after Pick Release is done successfully.
Choose the Concurrent or Online button.
Pick release is launched and pick releases the deliveries and delivery lines for the trip.
Save your work.
Your Order should now be Ship Confirm Eligible.
 RELEASED_STATUS: 'Y' – Staged/Pick Confirmed
Ship Confirm is the process of recording that items have shipped. When you Ship Confirm a delivery, Shipping Execution confirms that the delivery lines associated with the delivery have shipped.
Your Order should be Ship Confirm Eligible.
RELEASED_STATUS: 'Y' – Staged/Pick Confirmed
Navigate to: Order Management/Shipping/Transactions
Navigate to the Query Manager window, and find the Delivery. The Delivery displays in the Shipping Transactions window. Delivery is a not null column. If Delivery is null, you need to perform the action Auto-create Deliveries. Delivery is passed as Shipment Number to INV and PO.
Under Delivery alternative region, select Ship Confirmfrom the Actions menu to display the Confirm Deliverywindow. In the Ship Options region, select Ship All to ship confirm the entire quantity regardless of what was entered in the Shipped Quantity field. In the Auto-create Trip Options region, select the ship method and the actual departure date. The simplest way to ship confirm one or more deliveries is to enable the Set Delivery in-Transit and Close Trip fields.
Set Delivery In-transit: Creates a trip and stops for the delivery. Closes first stop of the delivery, but leaves second stop open. Sets status of delivery to In-transit and initiates Order Management (OM) and Inventory interfaces.
Close Trip: Creates a trip and stops for the delivery. Closes trip, all stops, and the delivery.
If you uncheck the Defer Interface box and run Ship Confirm, the Inventory Interface is run automatically, and the Order Line status is updated. A request is submitted to run Interface Trip Stop with mode All for the trip stop.
If you check the Defer Interface box and run Ship Confirm, you need to run the Interface Trip Stop-SRSconcurrent request to update the Inventory and the Order Line status. When the Defer Interface box is checked, a request is not automatically submitted to interface the trip stops.
Choose the Go button to ship confirm and save your work.
Your Order should now be Ship Confirm, Confirmed and Inventory Interface, Interfaced.
RELEASED_STATUS: 'C' – Ship Confirmed
Major Tables Impacted | Major Columns |
wsh_delivery_details | OE_INTERFACED_FLAG, INV_INTERFACED_FLAG, ORGANIZATION_ID, RELEASED_STATUS, SHIP_FROM_LOCATION_ID, SHIP_TO_LOCATION_ID, SHIPPED_QUANTITY, DELIVERY_DETAIL_ID |
INV_INTERFACED_FLAG = 'N' – Not Interfaced
'Y' – Record in MTL_MATERIAL_TRANSACTIONS
'P' – Error Condition
OE_INTERFACED_FLAG = 'N' – Not Interfaced
'Y' – Record in OE_ORDER_LINES_ALL
If the Interface Trip Stop concurrent request is run, record is created in MTL_SUPPLY with SUPPLY_TYPE_CODE = 'SHIPMENT'.
Ship Confirm inserts records into MTL_TRANSACTIONS_INTERFACE.
Navigate to: Order Management/Shipping/Interfaces/Run
Run the request: Interface Trip Stop – SRS.
Mode: All – All Interfaces
Inventory – Interface to Inventory
OM and DSNO – Interface to Order Management and Submit DSNO
Inventory Interface- SRS is run to update inventory with the ship confirmation information. Inventory balances are decremented and reservations relieved. This program always spawns the Order Management Interface - SRS program. It is very important in the process flow that the Inventory Interface complete before the Order Management Interface to ensure the integrity of the reservation information.
Inventory Interface picks records from MTI (MTL_TRANSACTIONS_INTERFACE) and inserts them into MMTT (MTL_MATERIAL_TRANSACTIONS_TEMP). The Inventory Manager then inserts rows into RTI (RCV_TRANSACTIONS_INTERFACE) and calls the Receiving Transaction Processor.
If transfer type is Direct, the Receiving Transaction Processor inserts a record into MMTT and calls the inventory function inltpu() which inserts records into MMT (MTL_MATERIAL_TRANSACTIONS) and MOQ (MTL_ONHAND_QUANTITIES) and completes the delivery of the item into Inventory. The Receiving Transaction Processor also inserts records into RSH (RCV_SHIPMENT_HEADERS), RSL (RCV_SHIPMENT_LINES) and RT (RCV_TRANSACTIONS). It also updates theQUANTITY_RECEIVED and QUANTITY_DELIVERED on PO_REQUISITION_LINES_ALL. Records get deleted from MTL_SUPPLY on delivery into Inventory.
Major Tables Impacted | Major Columns |
MTL_MATERIAL_TRANSACTIONS_TEMP | TRANSACTION_HEADER_ID, TRANSACTION_TEMP_ID, ORGANIZATION_ID, OWNING_ORGANIZATION_ID, SOURCE_CODE, PARENT_LINE_ID, PARENT_TRANSACTION_TEMP_ID, PRIMARY_QUANTITY, RCV_TRANSACTION_ID, SHIPMENT_NUMBER, SHIPPED_QUANTITY, TRANSACTION_QUANTITY, SHIP_TO_LOCATION, REQUISITION_DISTRIBUTION_ID, REQUISITION_LINE_ID |
MTL_MATERIAL_TRANSACTIONS | ORGANIZATION_ID, OWNING_ORGANIZATION_ID, SOURCE_CODE, SOURCE_LINE_ID, PRIMARY_QUANTITY, RCV_TRANSACTION_ID, SHIP_TO_LOCATION_ID, SHIPMENT_NUMBER, TRANSACTION_ID, TRANSACTION_TEMP_ID, TRANSACTION_QUANTITY, TRANSACTION_DATE |
MTL_ONHAND_QUANTITIES | DATE_RECEIVED, ORGANIZATION_ID, SUBINVENTORY_CODE, TRANSACTION_QUANTITY, UPDATE_TRANSACTION_ID |
RCV_SHIPMENT_HEADERS | RECEIPT_NUM, SHIPMENT_HEADER_ID, SHIPMENT_NUM, SHIPPED_DATE, RECEIPT_SOURCE_CODE, SHIP_TO_LOCATION_ID, SHIP_TO_ORG_ID, ORGANIZATION_ID |
RCV_SHIPMENT_LINES | FROM_ORGANIZATION_ID, TO_ORGANIZATION_ID, TO_SUBINVENTORY, SHIP_TO_LOCATION_ID, QUANTITY_RECEIVED, QUANTITY_SHIPPED, SHIPMENT_HEADER_ID, SHIPMENT_LINE_ID, REQ_DISTRIBUTION_ID, REQUISITION_LINE_ID, OE_ORDER_HEADER_ID, OE_ORDER_LINE_ID, DELIVER_TO_LOCATION_ID, DESTINATION_TYPE_CODE |
RCV_TRANSACTIONS | ORGANIZATION_ID, SUBINVENTORY, SHIPMENT_HEADER_ID, SHIPMENT_LINE_ID, QUANTITY, TRANSACTION_DATE, TRANSACTION_ID, TRANSACTION_TYPE, REQ_DISTRIBUTION_ID, REQUISITION_LINE_ID, OE_ORDER_HEADER_ID, OE_ORDER_LINE_ID, DELIVER_TO_LOCATION_ID, DESTINATION_TYPE_CODE |
PO_REQUISITION_LINES_ALL | REQUISITION_LINE_ID, DESTINATION_ORGANIZATION_ID, DESTINATION_SUBINVENTORY, SOURCE_ORGANIZATION_ID, SOURCE_SUBINVENTORY, DELIVER_TO_LOCATION_ID, ORG_ID, CANCEL_FLAG, CLOSED_CODE, QUANTITY,QUANTITY_CANCELLED, QUANTITY_DELIVERED, QUANTITY_RECEIVED |
If transfer type is Intransit, the Receiving Transaction Processor just creates the shipment by inserting records into RCV_SHIPMENT_HEADERS and RCV_SHIPMENT_LINES. Then you need to explicitly receive from the Enter Receipts screen. Record is also created in MTL_SUPPLY with SUPPLY_TYPE_CODE = 'SHIPMENT'.
Order Management Interface is run to update Order Management with the ship confirmation information. Order line shipped quantities will be updated.
.
Receive/Deliver the Shipment for the Internal Order
Navigate to: Purchasing/Receiving/Enter Receipts.
Query against the Requisition Number or the Shipment Number (Delivery Number on the Shipping Transactions window) and do the Receive/Deliver Transactions.
Major Tables Impacted | Major Columns |
rcv_shipment_headers | RECEIPT_NUM, SHIPMENT_HEADER_ID, SHIPMENT_NUM, SHIPPED_DATE, RECEIPT_SOURCE_CODE, SHIP_TO_LOCATION_ID, SHIP_TO_ORG_ID, ORGANIZATION_ID |
rcv_shipment_lines | FROM_ORGANIZATION_ID, TO_ORGANIZATION_ID, TO_SUBINVENTORY, SHIP_TO_LOCATION_ID, SHIPMENT_HEADER_ID, SHIPMENT_LINE_ID, QUANTITY_RECEIVED, QUANTITY_SHIPPED, REQ_DISTRIBUTION_ID, REQUISITION_LINE_ID, OE_ORDER_HEADER_ID, OE_ORDER_LINE_ID, DELIVER_TO_LOCATION_ID, DESTINATION_TYPE_CODE |
rcv_transactions | ORGANIZATION_ID, SUBINVENTORY, SHIPMENT_HEADER_ID, SHIPMENT_LINE_ID, QUANTITY, TRANSACTION_DATE, TRANSACTION_ID, TRANSACTION_TYPE, REQ_DISTRIBUTION_ID, REQUISITION_LINE_ID, OE_ORDER_HEADER_ID, OE_ORDER_LINE_ID, DELIVER_TO_LOCATION_ID, DESTINATION_TYPE_CODE |
Record is created in MTL_SUPPLY with SUPPLY_TYPE_CODE = 'RECEIVING' on performing a Receive transaction. But records get deleted from MTL_SUPPLY on delivery into Inventory.