OSP Cycle
This post is about Oracle Outside Processing Cycle. Outside processing is used when we don't have in house resources to complete a particular operations. In these cases we send material or assembly for outside processing. In other words we leverage the capacity and specialized skills of our suppliers for the work which we can not perform efficiently in house.
Normally company purchase raw material and perform few operations and then send material outside. we will follow the same example
Setup Steps
1) Create Items : FG1 (Finished Good, Its the main item being manufactured), RAW1 (Raw Material), OSP1 (Outside processing)
2) Resource Creation : OSPRes1 (OSP Resource)
3) Department Creation : OSP_DEP1 (OSP Department and Assign Resource to Department
4) Define Routings
5) Define BOM
Step 1) First thing is to define Items
Lets define three items FG1, RAW1, OSP1
# FG1 > please use Finished Good Template

# RAW1 > Its a purchased item so use purchasing template.

# OSP1> Its outside processing item therefore use Outside Processing template

In purchasing tab make sure to tick Purchased, Purchasable, Outside processing Item and enter a value in list price. If list price not entered then the cycle will fail at the time of importing the requisitions.

Outside processing Item unit type can be Assembly or Resource
If its assembly and resource basis is item then system will create 1 qty in the requisition for each assembly and if resource basis is lot then system will create 1 qty for Job.
Similarly if you want usage as rate or amount the use resource and like you are buying 1 hour of cutting or painting.
For our case we will take it as assembly
Step 2) Resource Creation
Navigate to Bill of Material responsibility>Routing>Resource

Define OSPRes1 as resource type as Miscellaneous and UOM as HR.
Charge Type take as PO move ( PO receipt automatically generates the WIP Move transaction from the outside processing operation to the next operation on the routing. If PO receipt then you need to manually move to next operation) and basis Item.
In outside Processing region enter our OSP1 Item.
Step 3) Department Creation
Create an OSP Department (OSP_DEP1). Make sure to assign it a location (This is the delivery location used in PO), otherwise you may get an error w
while importing the requisitions

Click On Resources button and assign the resource created in step 2

Step 4) Define Routing

Enter Finished good item in header and In main tab put departments. Click on operation resources and enter the operation resource created in step 2 for OSP_DEP1

Save it
Step 5) Create BOM

Enter Item and components as shown in screenshot above. Save your work
Test case
Now Lets test this setups by Create a job and releasing it. Then import requisition >auto create PO > ReceivingMake sure to Misc receive Raw1 material before starting this
Step 1) Create a Job and release it for this Finished good FG1. Navigate to WIP responsibility>Discrete>Discrete Job

Change Status To Releases and then Save it
Step 2) Navigate to Move transaction window and enter your job umber in Job field

Seq of Operation is from 10 to 20 and qty as 5. Save it
this will insert data in PO_requisitions_interface_all table and then you need to import the requisition
Step 3) Import Requisition
Switch to PO responsibility and run Requisition Import program

Click OK and submit the request. Make sure request completes and in the output you get a message that Number of approved requisitions created = 1
Some time this request fires automatically base don your setting in WIP Parameters.
If this process fails to create any requisition or error out run PO requisition except report to find out the error.
Step 4) Auto create the PO from the requisitions
Check the requisition in the Requisition summary by putting OSP1 item in item tab and auto create this requisition to PO and then approve it.

Now receive this PO. Here you can see Destination type will be Shop floor and location is same as department's location.

Step 5) Now check the WIP move pending transaction.
When the receipt is made, Purchasing triggered a Move transaction by inserting a record into the
WIP_MOVE_TXN_INTERFACE table. This record is waiting to be processed by the Move Transaction Interface manager. You can check them in pending move transaction table.

This Transaction is automatically processed. Now navigate to Jobs>Operations
You can see in screenshot below there are 5 qty To Move. So we need to perform completion transaction.
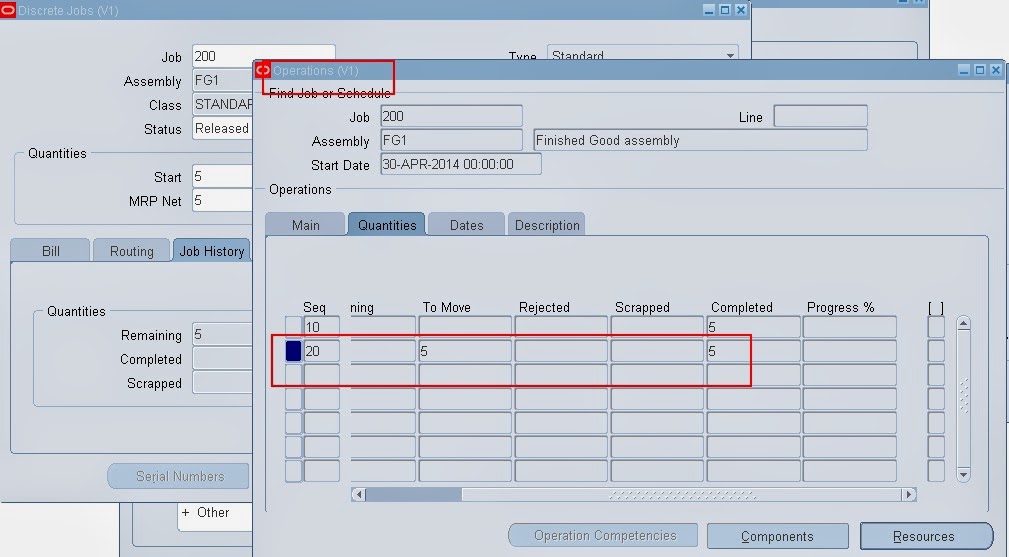
Step 6) As OSP is the last step in the routing, so we have to do completion transaction.

Click on Continue

Enter completion subinventory and qty and click Done

Now check the WIP job, you can see the completed qty is 5 and onhand has increased
Thanks
Mandeep
------------------------------------------------------------------------------------------------------------------------------------------------------------------
Please share this knowledge with your friends and subscribe at our blog for more updates. If you have any queries, please participate in our Forum or by leaving your comments below.
-----------------------------------------------------------------------------------------------------------------------------------------------