Translate

Wednesday, May 5, 2021

Oracle Forms 10g release 2 : Demos, Tips and Techniques ON-INSERT ,ON-UPDATE , ON-LOCK (insert, update and delete) Trigger.

1. Introduction


Here is a collection of Oracle Forms 10g sample dialogs extracted from a complete Oracle Forms tutorial.

This tutorial has been written in French and it would be too time consuming to translate it all in English.

This is the reason why I have only extracted and translated these sample dialogs.


The purpose of this article is not to teach how to build a new form from scratch. It intends to show some of the main advanced features of the product.


To clearly understand in details how these dialogs work, you will have to open them in the Forms Builder and examine them thoroughly.

However, in this article, I am going to explain the best I can the most important mechanisms of each sample.


These sample have been tested with an Oracle Forms 10g release 10.1.2.0.2 on an Oracle Database 10g Express Edition Release 10.2.0.1.0.


2. Description of the sample dialogs


2.1 Main screen


TUTO_FORMS.FMB


This dialog is the entry point of the samples. Click on a button to start the corresponding dialog.


2.2 Canvases


TEST_CANVAS.FMB


This sample shows three types of canvas :


§         The content canvas (light green)

§         The stacked canvas (white)

§         The tab canvas (dark green)


Stacked canvas

A stacked canvas is displayed atop—or stacked on—the content canvas assigned to the current window. Stacked canvases obscure some part of the underlying content canvas, and often are shown and hidden programmatically. You can display more than one stacked canvas in a window at the same time

A stacked canvas allows to scroll a big canvas in a delimited window.

In this sample, the stacked canvas (CV_EMP_1) is twice bigger than its viewport.


The <Down> button allows to move the stacked canvas programatically:


Set_View_Property('CV_EMP_1', VIEWPORT_Y_POS_ON_CANVAS, 140) ;


Here are the properties of this stacked canvas:


Viewport

Viewport X position        77

Viewport Y position       11

Viewport Width             212

Viewport Height             138


Physical

Viewport X position on canvas    0

Viewport Y position on canvas    0

Width                                       212

Height                                      324


The second Stacked canvas (CV_EMP_3) demonstrates how to integrate in a Tab canvas:


2.3 Blocks


2.3.1 Block based on a complex view


TEST_BLOC_VUE.FMB


This sample show how you can base a block on a view that aggregate the columns of several tables (in this case, DEPT and EMP) and when you can insert, update and delete from the target tables from this view.


The code that handles the target table is located in a program unit, called from the three block-level triggers:


§         ON-INSERT

§         ON-UPDATE

§         ON-LOCK


This is the code of the ins_upd_emp_dept procedure:


PROCEDURE ins_upd_emp_dept IS

  LN$Dummy PLS_INTEGER := 0 ;

BEGIN

  -- Table DEPT --

  Begin

  Select 1

  Into LN$Dummy

  From DUAL

  Where exists( select deptno from dept where deptno = :EMP_DEPT.DEPTNO ) ;

    -- Found -> update --

       Message('Update DEPT table');

       UPDATE DEPT

       SET    DNAME = :EMP_DEPT.DNAME

       WHERE  DEPTNO = :EMP_DEPT.DEPTNO ;

  Exception

       When no_data_found Then

    -- Not found -> insert --

       Message('Insert into DEPT table');

       INSERT INTO DEPT ( DEPTNO, DNAME )

       VALUES ( :EMP_DEPT.DEPTNO, :EMP_DEPT.DNAME ) ;

  End ;


  -- Table EMP --

  Begin

  Select 1

  Into LN$Dummy

  From DUAL

  Where exists( select empno from emp where empno = :EMP_DEPT.EMPNO ) ;

    -- Found -> update --

       Message('Update EMP table');

       UPDATE EMP

       SET    ENAME = :EMP_DEPT.ENAME

       WHERE  EMPNO = :EMP_DEPT.EMPNO ;

  Exception

       When no_data_found Then

    -- Not found -> insert --

       Message('Insert into EMP table');

       INSERT INTO EMP ( EMPNO, ENAME )

       VALUES ( :EMP_DEPT.EMPNO, :EMP_DEPT.ENAME ) ;

  End ;


END;


2.3.2 Block based on stored procedures
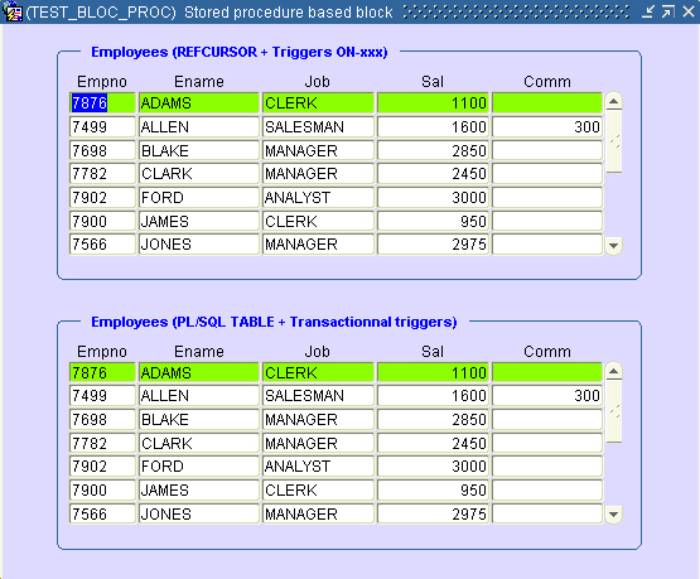
 

TEST_BLOC_PROC.FMB


This sample demonstrates how a block can be based on stored procedures.

This feature can be implemented in two ways:


§         A REF CURSOR

§         A PL/SQL table


In addition to that, there are also two different locations where to implement this functionality:


§         The ON-xxx triggers

§         The transactionnal triggers


In this sample, the top block uses a REF CURSOR with the ON-xxx triggers

The bottom block uses a collection with the standard transactionnal triggers.


The stored procedures are located in the PKG_EMP package shipped with the scripts.


Block1 (EMP), REF CURSOR and ON-xxx triggers


The Query Data Source Type is set to Procedure and the Query Data Source Name indicates the name of the query procedure.


The insert, update, delete and lock orders are managed in the corresponding On-xxx triggers:


Example of ON-INSERT trigger:


DECLARE

    LR$Emp emp_pkg.emp_rec;

BEGIN


    LR$Emp.empno := :emp.empno;

    LR$Emp.ename := :emp.ename;

    LR$Emp.job   := :emp.job;

    LR$Emp.sal   := :emp.sal;

    LR$Emp.comm  := :emp.comm;


    emp_pkg.emp_insert( LR$Emp );

END;


The variable used as parameter is of type of emp_pkg.emp_rec


  TYPE emp_rec IS RECORD(

    empno    emp.empno%TYPE,

    ename    emp.ename%TYPE,

    job      emp.job%TYPE,

    sal      emp.sal%TYPE,

    comm     emp.comm%TYPE);


Then the emp_pkg.emp_insert() stored procedure:


  ------------

  -- Insert --

  ------------

  PROCEDURE emp_insert(r IN emp_rec) IS

  BEGIN

    INSERT INTO emp (empno, ename, job, sal, comm)

       VALUES(r.empno, r.ename, r.job, r.sal, r.comm);

  END emp_insert;


Block2 (EMP_TRG), Collection and transactionnal triggers


This block uses a collection of records with the emp.pkg.emp_query procedure.


  TYPE emptab IS TABLE OF emp_rec INDEX BY BINARY_INTEGER;


  PROCEDURE emp_query(emp_data IN OUT emptab) IS

    ii NUMBER;

    CURSOR empselect IS

      SELECT empno, ename, job, sal, comm FROM emp

         ORDER BY ename ;

  BEGIN

    OPEN empselect;

    ii := 1;

    LOOP

      FETCH empselect INTO

        emp_data( ii ).empno,

        emp_data( ii ).ename,

        emp_data( ii ).job,

        emp_data( ii ).sal,

        emp_data( ii ).comm;

      EXIT WHEN empselect%NOTFOUND;

      ii := ii + 1;

    END LOOP;

  END emp_query;


The collection of records is an IN OUT parameter, read from the database and returned to Forms.


The insert, update,delete and lock orders are also managed by stored procedures.

(see them in detail in the EMP_PKG package)


Have also a look at the Query Data Source Column property that manages the relation between the columns of the collection and the items of the block.


2.3.3 Block based on a relational table that contains a collection


TEST_COLLECTION.FMB


In this dialog, we can see how to handle a table that contains a nested table (collection).

There is no standard buit-in to base a block on a collection, but we will see how easy it is to work with this sort of object via the ON-xxx triggers.


Here is the description of the table (ARTICLES)


 CREATE TABLE ARTICLES

   (   CODE     VARCHAR2(20 BYTE),

       LIBELLE  VARCHAR2(100 BYTE),

       PRIX     NUMBER(8,2),

       QTETOT   NUMBER(8,0),

       CASES    TAB_TYP_CASE

   )

 NESTED TABLE CASES STORE AS CASES_NT

 RETURN AS VALUE;


TAB_TYP_CASE is a table of objects of type :  TYP_CASE


create or replace TYPE TYP_CASE AS OBJECT

 (

   EMP   VARCHAR2(10),

   QTE    NUMBER

 )


In this sample, the first block (ARTICLES) displays the standard columns of the ARTICLE table and the second block (detail) displays the columns of its nested table.


Populate the detail block (nested table)


The detail block (CASES) is dynamically populated each time a master record change in a When-New-Record-Instance of the master block:


Declare

   LC$Req  Varchar2(256) ;

Begin

  If :ARTICLES.CODE Is not null Then

     -- Dynamic query of secondary block --

     LC$Req := '(SELECT cases.EMP, cases.QTE FROM TABLE ( SELECT cases FROM articles WHERE code = ''' || :ARTICLES.CODE || ''') cases)' ;

     Go_Block('CASES' );

     Clear_Block ;

     Set_Block_Property( 'CASES', QUERY_DATA_SOURCE_NAME, LC$Req ) ;

     -- populate the block --

     Execute_Query ;

     Go_Block('ARTICLES') ;

  Else

     Go_Block('CASES' );

     Clear_Block ;

     Go_Block('ARTICLES') ;

  End if ;

End ; 


Because it is not possible to create a new article with a NULL collection, we have to handle the insertion into the ARTICLE table in a ON-INSERT trigger:


--------------------------------------------------------------

--  we are doing an explicit insert because the new record  --

--  cannot contain a NULL collection                        --

--------------------------------------------------------------

INSERT INTO ARTICLES

  (

    CODE,

    LIBELLE,

    PRIX,

    QTETOT,

    CASES

  )

  VALUES

  (

    :ARTICLES.CODE,

    :ARTICLES.LIBELLE,

    :ARTICLES.PRIX,

    :ARTICLES.QTETOT,

    TAB_TYP_CASE()  -- insert an empty collection

  )

  ;


Indeed, if we insert a NULL collection, it will be no longer possible to insert anything in the nested table.


Then after, it is easy to manage the detail records with the ON-xxx triggers of the CASES block:


ON-INSERT:


-- Insert the row in the collection --

INSERT INTO TABLE

 ( 

   SELECT

      cases

   FROM

      articles

   WHERE

      code = :ARTICLES.CODE

 )

 Values

 (

   TYP_CASE( :CASES.EMP, :CASES.QTE )

 );


ON-DELETE:


-- Delete row in the collection --

DELETE FROM TABLE

 ( 

   SELECT

      cases

   FROM

      articles

   WHERE

      code = :ARTICLES.CODE

 ) cases

 WHERE

   cases.emp = :CASES.EMP

 ;


etc.


2.3.4 Block based on multiple data sources


TEST_DATA_SOURCES.FMB


I this sample dialog, we can see how to base a block on several tables that share an identical structure.

(see the JANVIER, FEVRIER and MARS tables created by the install.sql script)


The list item is populated with the name of three tables that share the same structure:


Then, the source table of the block is changed dynamically in the When-List-Changed trigger:


If :CTRL.CHOIX is not null Then

   :global.choix := :ctrl.choix ;

   clear_form ;

   :ctrl.choix := :global.choix ;

   -- change the Query Data Source --

   Set_Block_Property('TEST2', QUERY_DATA_SOURCE_NAME, :global.CHOIX );

   go_block('TEST2');

   execute_query;

End if ;    


2.3.5 Block based on an object table that contains a collection of references


TEST_OBJETS.FMB


Let’s see how to manage an object table that contains a collection of references.


This sample is based on the object table (ARTICLE_OBJ) that contains a collection of references:


create or replace TYPE REF_TYP_EMP AS OBJECT

(

  ref_emp REF TYP_EMP

)


create or replace TYPE TAB_REF_TYP_EMP AS TABLE OF REF_TYP_EMP


create or replace TYPE TYP_ARTICLES AS OBJECT

(

  CODE     VARCHAR2 (20),

  LIBELLE  VARCHAR2 (100),

  PRIX     NUMBER (8,2),

  QTETOT   NUMBER (8),

  REMP     TAB_REF_TYP_EMP  -- collection

)


 CREATE TABLE ARTICLES_OBJ OF TYP_ARTICLES

 NESTED TABLE REMP STORE AS REMP_NT

 RETURN AS VALUE;


The tip is the same that the one used to manage the relational table with nested table:


- A when-New-Record-Instance  trigger on the master block to populate the detail block (the collection of references):


Declare

  LC$Req  Varchar2(256) ;

Begin

  If :ARTICLES.CODE Is not null Then

     -- Dynamic query of secondary block --

     LC$Req := '(SELECT emp.ref_emp.emp EMP, emp.ref_emp.qte QTE

       FROM TABLE( SELECT REMP FROM articles_obj WHERE CODE = ''' || :ARTICLES.CODE || ''') emp

       WHERE emp.ref_emp.art = ''' || :ARTICLES.CODE || ''')' ;

     Go_Block('CASES' );

     Clear_Block ;

     -- change the Query Data Source Name --

     Set_Block_Property( 'CASES', QUERY_DATA_SOURCE_NAME, LC$Req ) ;

     -- populate the block --

     Execute_Query ;

     Go_Block('ARTICLES') ;

  Else

     Go_Block('CASES' );

     Clear_Block ;

     Go_Block('ARTICLES') ;

  End if ;

End ; 


- An ON-INSERT trigger to insert a new record with an empty collection:


-------------------------------------------------------

--  We are doing an implicit insert because the new  --

--  record cannot contain a NULL collection          --

-------------------------------------------------------

INSERT INTO ARTICLES_OBJ

VALUES

(

  TYP_ARTICLES

  (

     :ARTICLES.CODE,

     :ARTICLES.LIBELLE,

     :ARTICLES.PRIX,

     :ARTICLES.QTETOT,

     TAB_REF_TYP_EMP()

   )

) ;


The collection of references is managed with the corresponding ON-xxx trigger of the detail block:


ON-INSERT:


-- Insert a row (REF) in the collection --

Declare

       LC$Req Varchar2(256) ;

Begin 

       LC$Req := 'INSERT INTO TABLE

       ( SELECT remp FROM ARTICLES_OBJ WHERE code = ''' || :ARTICLES.CODE  || ''')

       VALUES

       ( REF_TYP_EMP ( (SELECT REF(a) FROM EMP_OBJ a WHERE a.ART = '''

         || :ARTICLES.CODE || ''' AND a.EMP = ''' || :CASES.EMP || ''') ) )' ;


       Forms_Ddl( LC$Req ) ;


End ;


ON-DELETE:


-- Delete the row (REF) of the collection --

DELETE FROM TABLE

  ( SELECT remp FROM ARTICLES_OBJ WHERE code = :ARTICLES.CODE ) emp

WHERE

   emp.ref_emp.art = :ARTICLES.CODE

And

   emp.ref_emp.emp = :CASES.EMP

;


2.4 Items


2.4.1 Principal items


TEST_ITEMS.FMB


Here is a description of the main items.

Click everywhere on each item to see some information messages and some particular behaviours.


2.4.2 List items


TEST_LISTES.FMB


Let’s study and handle the three sorts of list item and also the different ways to populate them.

In this sample, the three list items are synchronized. Change the value of the first list and it will adapt the content of the second then the content of the third.


For each new list value, the corresponding value and label are displayed.


a) The first list item is populated with the RG_MOIS record group:


  -- List 1 --

  errcode := Populate_Group( 'RG_MOIS' );


  CLEAR_LIST('BLOC2.LISTE1');

  POPULATE_LIST('BLOC2.LISTE1', 'RG_MOIS' );

  -- Select the first value --

  :BLOC2.LISTE1 := Get_List_Element_Value('BLOC2.LISTE1', 1 ) ;


b) Then init the second list item


  -- Update the weeks list --

  errcode := Populate_Group( 'RG_SEMAINES' );


  CLEAR_LIST('BLOC2.LISTE2');

  POPULATE_LIST('BLOC2.LISTE2', 'RG_SEMAINES' );


  -- Select the first value --

  :BLOC2.LISTE2 := Get_List_Element_Value('BLOC2.LISTE2', 1 ) ;


c) That finally init the third list item:


PROCEDURE Init_Liste3 IS

   LC$D    Varchar2(12) ;

   LC$Day Varchar2(20) ;

BEGIN

   -- Update the days list --

   LC$D := '01/01/2005' ;

   Clear_List( 'BLOC2.LISTE3' );


   For i IN 0..6 Loop

      SELECT

        to_char( To_date(LC$D, 'DD/MM/YYYY' ) + (i + ((To_number(:BLOC2.LISTE2)-1) * 7)), 'FMDay DD Month' )

      Into

        LC$Day

      FROM dual ;


      Add_List_Element('BLOC2.LISTE3', i + 1, LC$Day, LC$Day ) ;


   End loop ;


   -- Select the first value --

   :BLOC2.LISTE3 := Get_List_Element_Value('BLOC2.LISTE3', 1 ) ;


Exception

   When Others then

      Null ;       

END;


2.4.3 Image items


ALBUM_PHOTO.FMB


This dialog is the main part of the ensemble that allows to search, attach and display images.


You can build a photo album based on a one image’s column table.


  CREATE TABLE PHOTOS

   (   LEGENDE      VARCHAR2(100 BYTE),

       PHOTO        BLOB NOT NULL ENABLE,

       FORMAT       VARCHAR2(50 BYTE) NOT NULL ENABLE,

       CREDIT       VARCHAR2(50 BYTE) NOT NULL ENABLE,

       LIEN         VARCHAR2(100 BYTE),

       IDENTIFIANT  NUMBER(5,0) NOT NULL ENABLE,

       NOM          VARCHAR2(50 BYTE),

        CONSTRAINT PHOTO_PK PRIMARY KEY (IDENTIFIANT) ENABLE

   ) ;


It shows two ways to search a filename on the local machine with and without Webutil.


By clicking on a picture, you can navigate on another canvas to display the detail of the picture:


CHARGE_PHOTO.FMB


The get_file_name sample dialog is only a “pure exercice of style” , because it is so easy to pick-up a file with the File_Open_Dialog() Webutil function.

This sample is interesting to see how to use the HOST() and TEXT_IO() functions to get the list of the local machine drives and their content.


CHARGE_PHOTO_WEBUTIL.FMB


Another dialog to store the picture and its properties.


2.4.4 Java Bean component


TEST_GRAPH.FMB


Here is a sample to demonstrate how to handle a bean area.

This dialog use the Oracle FormsGraph Java Bean that is part of the Oracle Forms demos.


You can download the FormsGraph.jar file on the OTN page

http://www.oracle.com/technology/sample_code/products/forms/files/formsgraph_patch2005.zip


2.4.5 Calculated items
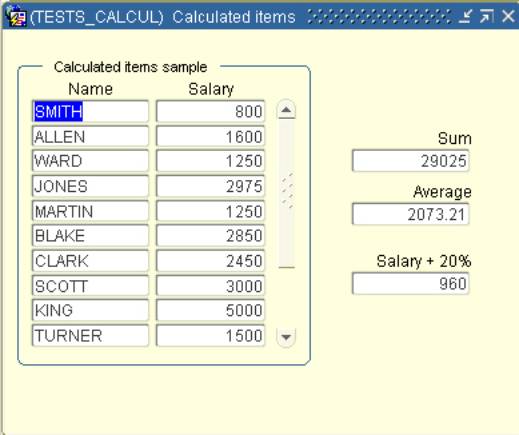
 

TESTS_CALCUL.FMB


Let’s see how to use the calculated items.


The first calculated item use the Summary calculation mode:


The third one use a Formula calculation mode


2.5 Alerts


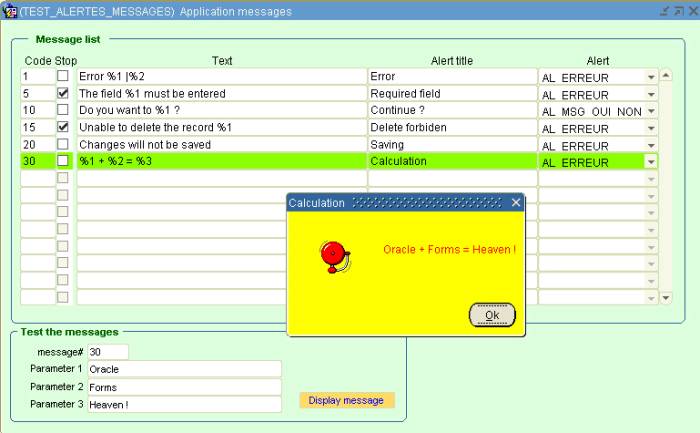
TEST_ALERTES_MESSAGES.FMB


This dialog shows how to use the Alert boxes to build the messaging engine of your Forms application.


The message texts are read from the database then displayed via Alert boxes.

To reduce the number of messages needed in the application, some of  them can take from 1 up to 3 parmeters (%1, %2 and %3). A pipe (|) character allows to split the message on several lines.


The main block is based on the MESSAGES table.


   CREATE TABLE  MESSAGES

   (   CODE    NUMBER(5,0) NOT NULL ENABLE,             -- unique identifiant

       TEXTE   VARCHAR2(256) NOT NULL ENABLE,           -- text of the message

       TITRE   VARCHAR2(100),                           -- title of the alert

       STOP    VARCHAR2(1) DEFAULT 'N' NOT NULL ENABLE, -- Shall we stop the process ? (raise form_trigger_failure)

       ALERTE  VARCHAR2(15),                            -- name of the alert box

        CONSTRAINT MSG_PK PRIMARY KEY (CODE) ENABLE

   )


This sample use the Affiche_Message() procedure of the TUTO_FORMS pl/sql library to display the messages.

These messages can be displayed through the 3 alert boxes available in every dialog of this demo.


§         AL_ERREUR wich is the simple “OK” alert box.

§         AL_MSG_OUI_NON wich is a yes/no alert box (default yes)

§         AL_MSG_NON_OUI wich is a yes/no alert box (default no)


2.6 Property classes and visual attributes


TEST_CLASSES_PROP.FMB


Let’s see some ways to use the property classes and the visual attributes to colorize and highlight dynamically different objects of the form (alert, item, current record, etc.).

Property classes and visual attributes are located in the OBJ_TUTO_FORMS.olb object library.


2.7 Forms internal triggering events


TEST_CYCLES.FMB


This dialog allows you to understand what trigger fire and in what order when you use the application.


Before each particular action, you can clear the list of triggers window.

This window show you what trigger is firing in what order and from what block and what item.


3. Installation steps


This sample dialog need database objects to run.

All the necessary objects are provided in the tutoforms10g.zip file shipped with the article.


This zip file contains 2 sub directories:


/config that contains the configuration files.

/scripts that contains the Sql script files to create the database objects.


§         Download the tutoforms10g.zip file


§         Unzip the tutoforms10g.zip file under your <DEVSUITE_HOME>/forms/ directory.


§         Create a new user in your database


§         With Sql*plus or SqlDeveloper, run the /scripts/install.sql script
note : because this demo use the Webutil functions, the Oracle user where you have created these objects must have the 
WEBUTIL_DB package compiled or a grant EXECUTE to this package if it is present in another schema.


§         Under the /tutoforms/ directory compile all the source modules
You can use the compile_all.bat file located in the same directory to compile all objects at once.
      e.g.     
compile_all user/password@instance


§         Edit the /tutoforms/config/tutforms10g.env file to indicate your own settings (in blue in this example)


#oracle home  adapt this value to your own setting

ORACLE_HOME=D:\Dev10gR2


FORMS_PATH=%ORACLE_HOME%\forms\tutoforms

ORACLE_PATH=%ORACLE_HOME%\forms\tutoforms

FORMS_TRACE_PATH=%ORACLE_HOME%\forms\tutoforms

CLASSPATH=D:\Dev10gR2\forms\java\frmwebutil.jar;%ORACLE_HOME%\jlib\debugger.jar;%ORACLE_HOME%\forms\tutoforms\FormsGraph.jar;%ORACLE_HOME%\forms\tutoforms\myIcons.jar;


# webutil config file path

WEBUTIL_CONFIG=D:\Dev10gR2\forms\server\webutil.cfg


§         Edit the /tutoforms/config/ add_to_formsweb.cfg file to set your own database connect string (in blue in this example)


...

lookAndFeel=Oracle

colorScheme=blaf

logo=no

#don't forget to put your own database connexion

userid=tutoforms10g/tutoforms10g@XE


§         Copy the /tutoforms/config/tutforms10g.env to the /forms/server directory


§         add the /tutoforms/config/ add_to_formsweb.cfg at the end of your /forms/server/formsweb.cfg file

How to disable of the Add New Record Button, Clear Button and Delete Button from the Oracle apps Custom Form EBS R12.

How to disable of the Add New Record Button, Clear Button and Delete Button from the Oracle apps Custom Form EBS R12.


Write the code in the Form Level Trigger (WHEN-NEW-BLOCK-INSTANCE)
-- New Record Bottom, Clear Record Button and Delete Button is disable in the Oracle apps Form. --


       IF :XXBEX_PRO_BUDGET_HEADER_V.PROJECT_STATUS IN ('PROJECT APPROVED') THEN
           
               APP_SPECIAL.ENABLE('FILE.NEW', PROPERTY_OFF);                       
               APP_SPECIAL.ENABLE('EDIT.CLEAR', PROPERTY_OFF);
               APP_SPECIAL.ENABLE('EDIT.DELETE',PROPERTY_OFF);
        ELSE
               APP_SPECIAL.ENABLE('FILE.NEW', PROPERTY_ON);                       
               APP_SPECIAL.ENABLE('EDIT.CLEAR', PROPERTY_ON);
               APP_SPECIAL.ENABLE('EDIT.DELETE',PROPERTY_ON);

        END IF;


Tuesday, May 4, 2021

Oracle Forms: How to select multiple records in a block using a Record Group

 Oracle Forms: How to select multiple records in a block using a Record Group

I decided to create this demo because the question of how to select multiple records in a multi-record data block is a fairly common topic in the Oracle Technology Network (OTN) Forms discussion forum.  There are other ways of accomplishing this task, but I like to use Oracle Forms Record Groups because I ran into a situation where I needed to use a Record Group (RG) to perform a task in a form so I created a wrapper package to simplify the process of using a RG.  Over the years, the package has grown and I’ve come across situations that were easily solved by using the RG package I had created.


Disclaimer:  This demo is built using Oracle Forms 10g R2 (10.1.2.0.2) but it should work with older (as well as newer) versions of Oracle Forms.  This demo also uses the new sample HR schema.  If you don’t have access to this schema, you will have to modify the code to suit your needs.


There are two ways you can use this demo form.  First, you can just dig into the sample form provided and figure out what I did or second, you can follow the steps listed to recreate the sample form.


What you’ll need to build this demo:

  1. Oracle Forms 10g (Oracle Developer Suite 10g R2)
  2. A valid Oracle database account
    1. The demo was built using the HR schema
  3. The Craig.pll library.  This library contains the Record Group package needed by this demo form.


Note:  as I indicated above, you can use Oracle Forms 6i or any version of Oracle Forms newer than Forms 6i.  I have not tested the Record Group package with any version of Oracle Forms older than Forms 6i so you are on your own if you try to make this demo work with a version older than Forms 6i.


Let’s get started…


  1. Open Oracle Forms Builder and create a new Forms module.
  2. Connect to your database with a user that has SELECT privilege to the HR schema tables.
  3. Create a new data block using the Data Block Wizard and select the HR.EMPLOYEES table and all columns.
    1. Let the Data Block Wizard call the Layout Wizard to display all columns in a Tabular Layout.
  4. Add a new “Non-database” item as the last navigable item in the EMPLOYEES block and set the following properties of the item:
    1. NAME: SELECTED
    2. Item Type:  Check Box
    3. Value when Checked:  1
    4. Value when Unchecked:  0
    5. Check Box Mapping of Other Values:  Not Allowed
    6. Initial Value:  0
    7. Database Item:  No
    8. Width:  14
    9. Prompt:  Selected
    10. Prompt Attachment Edge:  Top
    11. Prompt Alignment:  Center
  5. Open the Property Pallet for the following item: JOB_ID, MANAGER_ID and DEPARTMENT_ID and scroll to the Physical set of properties and set the following properties:
    1. Visible:  No
    2. Canvas:  <NULL>
  6. Select the EMPLOYEES block and set the following properties:
    1. Show Scroll Bar:  Yes
    2. Scroll Bar Canvas:  CANVAS4 (use the name of the canvas created by the Layout Wizard).
  7. Now open the Layout Editor for you primary canvas and arrange the items so they appear similar to the following:


Note:  Because the Layout Wizard added most everything to your canvas, the FRAME will have the Update Layout property set to Automatically.  The quickest way to rearrange your layout is to size the enclosing Frame to a smaller size and let Forms automatically resize the frame to fit your displayed items and the scrollbar.  At this point, I typically change the Update Layout property to Manually because I don’t always like the way Forms adjusts the layout.  This is a preference issue and not something you need to change.


  1. Open the property pallet for the canvas created by the Layout Wizard and set the following properties:
    1. Name: EMPLOYEES
    2. Window: WINDOW1 (should already be set)
    3. Width:  717
    4. Height:  260
  2. Now it’s time to attach the CRAIG.PLL Forms library.  Go to the Object Navigator (ON) and click on the Attached Libraries node then click on the add button () in the ON  toolbar. This will open the Attach Library dialog.
    1. Click the Browse… button and navigate to the directory when you stored the CRAIG.pll and select this library file.
    2. Now click the Attach button.  Forms Builder will display an alert informing you that the library contains a non-portable directory specification and will ask if you want to remove the path.  Select “Yes” to this Alert.
  3. Now we need to create a new window object in the Windows node of the Object Navigator.  Open the property pallet for the new window and set the following properties:
    1. Name:  SELECTED

b.      Title:  Selected Rows

c.       Width:  313

d.      Height:  187

  1. Next, we need to create the Canvas that will be used to display the selected records output.  Click on the Canvases node of the Object Navigator and click the add button.
  2. Open the property pallet for the new canvas and set the following properties:
    1. Name:  SELECTED
    2. Window: SELECTED
    3. Width:  313
    4. Height:  187
  3. Now, let’s create a CONTROL block to store the Selected? button and the SELECTED_ITEMS Text-Item (which will be used to display which items were selected).
    1. Select the Data Blocks node in the Object Navigator (ON) and then click the add button in the ON toolbar.
    2. The New Data Block alert will display; select the Build a new data block manually option and click the OK button.
    3. Make sure the new block is placed after the EMPLOYEES block in the Data Blocks node.
  4. Set the following properties of the control block:
    1. Name:  CONTROL
    2. Database Data Block:  No
  5. Add a new item (Selected Items) to the Control block and set the following properties:
    1. Name:  SELECTED_ITEMS
    2. Item Type:  Text Item
    3. Multi-line: Yes
    4. Maximum Length:  2000
    5. Database Item:  No
    6. Insert Allowed:  No
    7. Update Allowed:  No
    8. Canvas:  SELECTED
    9. X Position:  12
    10. Y Position:  15
    11. Width:  288
    12. Bevel:  Plain
    13. Prompt:  Selected Rows
    14. Prompt Attachment Edge:  Top
  6. Add another new item (Selected Button) to the Control block and set the following properties:
    1. Name:  BTN_SELECTED
    2. Item Type:  Push Button
    3. Label:  Selected?
    4. Number of Items Displayed:  0
    5. Canvas:  EMPLOYEES
    6. X Position:  257
    7. Y Position:  232
    8. Width:  82
    9. Height:  16


At this point, the SELECTED canvas should look similar to the following:


Now it is time to start writing the code to make the form work.  Let’s start at the top and work our way down. 


  1. Select the Triggers node in Object Navigator.  This node is at the top of the object navigator and is commonly referred to as Form or Module level triggers.
  2. Click the Add button and add a WHEN-NEW-FORM-INSTANCE trigger with the following code.


DECLARE

            bIgnore                        BOOLEAN;

BEGIN

            -- RG - Name the Record Groups (RG) used to track the

            -- rows in the Employees table as well as which records

            -- are selected.

            Form_Vars.RG1_name := 'EMPLOYEES';

            Form_Vars.RG2_name := 'MULTISELECT';


            --RG - Now Initialize the RGs

            bIgnore := Rec_Group.Initialize(Form_Vars.RG1_name);

            bIgnore := Rec_Group.Initialize(Form_Vars.RG2_name);


            Go_Block('EMPLOYEES');

            Execute_Query;

END;


  1. Add a WHEN-WINDOW-CLOSED trigger with the following code:


IF ( Get_Window_Property('SELECTED', VISIBLE) = 'TRUE' ) THEN

            Hide_Window('SELECTED');

            Go_Block('EMPLOYEES');

ELSE

            Exit_Form;

END IF;


  1. Now we need to create three Alert objects.  These are used by the MSG package in the CRAIG.pll.  Click on the Alerts node and add the following alerts and set their properties accordingly.
    1. Stop

                                                              i.      Name:  STOP

                                                            ii.      Title:  Error

                                                          iii.      Alert Style:  Stop

                                                          iv.      Button 1 Label:  OK

                                                            v.      Button 2 Label:  null

    1. Caution

                                                              i.      Name:  CAUTION

                                                            ii.      Title:  Warning

                                                          iii.      Alert Style:  Caution

                                                          iv.      Button 1 Label:  OK

                                                            v.      Button 2 Label:  null

    1. Note

                                                              i.      Name:  Note

                                                            ii.      Title:  Information

                                                          iii.      Alert Style:  Note

                                                          iv.      Button 1 Label:  OK

                                                            v.      Button 2 Label:  null

  1. Now it is time to add the remaining code needed to make the process work.  We’ll start with the Program Units. 
    1. Open the Program Units node and add a Package Specification named: FORM_VARS with the following code:

PACKAGE Form_Vars IS

    RG1_name  VARCHAR2(30);

    RG2_name  VARCHAR2(30);

END;

Note:  The purpose of the FORM_VARS package specification is simply to create the equivalent of GLOBAL variables.  The benefit of using package specification variables instead of GLOBAL variables is that package specification variables use fewer resources and have greater flexibility in the DATA Types available.  I could have used Items in the CONTROL block as well, but I prefer to use a Package Specification because it is cleaner and less confusing than using a CONTROL block.


    1. Add a second Program Unit Procedure named SET_SELETED with the following code:

PROCEDURE set_selected (b_selected BOOLEAN DEFAULT TRUE) IS

   vName          VARCHAR2(9) := 'EMPLOYEES';

   vFirstItem    VARCHAR2(65) := vName||'.'||Get_Block_Property(vName,FIRST_ITEM);

   vCurrItem    VARCHAR2(65);

   vNextNavItem         VARCHAR2(65);

   vLastItem     VARCHAR2(65) := vName||'.'||Get_Block_Property(vName,LAST_ITEM);

   vNavigable   VARCHAR2(5) := 'TRUE';

   vDummy      VARCHAR2(65) := 'TRUE';

   vMsgLvl       VARCHAR2(3) := :SYSTEM.Message_Level;

BEGIN

            Go_Block(vName)

            :SYSTEM.Message_Level := 25;

            vNavigable := Get_Item_Property(vFirstItem,NAVIGABLE);

            :SYSTEM.Message_Level := vMsgLvl;


            IF ( vNavigable = 'TRUE' ) THEN 

                        Go_Item(vFirstItem);

            ELSE

                        vDummy := NULL||vName||'.'||Get_Item_Property(vFirstItem,NEXTITEM);


                        IF ( Get_Item_Property(vDummy,NAVIGABLE) = 'TRUE' ) THEN

                                    Go_Item(vDummy);

                        END IF;

            END IF;


            vCurrItem := :SYSTEM.CURSOR_ITEM;


            <<BLOCK_LIST>>

            WHILE ( vCurrItem != vLastItem ) LOOP

                        vNextNavItem := vName||'.'|| Get_Item_Property(vCurrItem,NEXT_NAVIGATION_ITEM);


                        vDummy := NULL||Get_Item_Property(vCurrItem,VISIBLE);


                        IF ( Get_Item_Property(vCurrItem,VISIBLE) = 'TRUE' ) THEN

                                    IF ( b_selected ) THEN

                                                Set_Item_Instance_Property(vCurrItem,CURRENT_RECORD, VISUAL_ATTRIBUTE, 'SELECTED');

                                    ELSE

                                                Set_Item_Instance_Property(vCurrItem,CURRENT_RECORD, VISUAL_ATTRIBUTE, 'DEFAULT');

                                    END IF;

                        END IF;

                        vCurrItem := vNextNavItem;

                        Go_Item(vCurrItem);

            END LOOP BLOCK_LIST;

END;


  1. Now, we need to add the Item trigger code.  Open the EMPLOYEES data block and add the following Block level triggers and code:
    1. Trigger:  POST-QUERY


DECLARE

            bIgnore                        BOOLEAN := FALSE;

BEGIN

            --Add a record to the Record Group.

            bIgnore := rec_group.add_value(p_name=>Form_Vars.RG1_name,

                                                             p_value=>:Employees.Employee_id,

                                                             p_record=>:system.trigger_record);

END;

Note: The Post-Query trigger ensures a record is added to the EMPLOYEES record group; which contains an entry for every record displayed in the multi-record block.


    1. Trigger:  WHEN-REMOVE-RECORD


DECLARE

            ignore              NUMBER;     

BEGIN

            -- Remove the Current Record from the Record Group (No DML occurs).

            ignore := rec_group.delete_value(Form_Vars.RG1_name,:Employees.Employee_id);

END;

Note:  The When-Remove-Record trigger ensures when a row is cleared or deleted from the multi-record block the corresponding record is removed from the EMPLOYEES record group.


  1. Now, we need to add the Item level triggers for the EMPLOYEES data block.  Open the EMPLOYEES block and add the following Item Triggers:
    1. ROW_NUM – WHEN-NEW-ITEM-INSTANCE

/* This instruction is needed just to prevent the user from navigating to the ROW_NUM column.

    I could have set the NAVIGATION property of the item, but this presented problems in the

    SET_SELECTED program unit and as this is just a demo form, I didn’t want to spend too

    much time on the development. :) */


Next_Item;


    1. SELECTED – WHEN-CHECKBOX-CHANGED


DECLARE

            bIgnore                        BOOLEAN;

            nIgnore                        NUMBER;

            nRec                            NUMBER;

BEGIN

            IF ( CHECKBOX_CHECKED('EMPLOYEES.SELECTED') ) THEN

                        --Checked.

                        bIgnore := Rec_Group.Add_Value(p_name => Form_Vars.RG2_name

                                                                        ,p_value => :EMPLOYEES.EMPLOYEE_ID

                                                                        ,p_inline => FALSE

                                                                        ,p_record => :system.trigger_record);

                        Set_Selected(TRUE);

            ELSE

                        --Unchecked.

                        --Check if the value exists first.

                        nRec := Rec_Group.Delete_Value(p_name => Form_Vars.RG2_name

                                                                          ,p_value => :EMPLOYEES.EMPLOYEE_ID);

                        Set_Selected(FALSE);

            END IF;

END;

Note:  This trigger takes care of adding or removing the selected/unselected records from the MULTISELECT record group.


  1. The final Item level trigger is the CONTROL block, BTN_SELECTED When-Button-Pressed trigger.  Open the CONTROL block and add the WHEN-BUTTON-PRESSED trigger and following code to the BTN_SELECTED item.


DECLARE

            nCount1          NUMBER := 0;

            nCount2          NUMBER := 0;

            nRec                NUMBER := 0;

            vDummy         VARCHAR2(10);


BEGIN

            --Get total number of selected records.

            nCount1 := Rec_Group.Get_Count(Form_Vars.RG2_name);

            nCount2 := Rec_Group.Get_Count(Form_Vars.RG1_name);


            IF ( nCount1 > 0 ) THEN

                        Go_Item('CONTROL.SELECTED_ITEMS');

                        Show_Window('SELECTED',136,45);

                        IF ( :CONTROL.SELECTED_ITEMS IS NOT NULL ) THEN

                                    :CONTROL.SELECTED_ITEMS := NULL;

                        END IF;


                        --Get the Rec Num of each selected record. 

                        <<SELECTED>>      

                        FOR i IN 1..nCount1 LOOP

                                    vDummy := Rec_Group.Get_Value(Form_Vars.RG2_name,i);

                                    nRec := Rec_Group.Get_Number(Form_Vars.RG1_name, Rec_Group.Get_Value(Form_Vars.RG2_name,i) );


                                    --Display value of each selected record.

                                    --Msg.Show('N','Rec#: '||nRec||' and Emp ID: '||vDummy||' selected.');                                

                                    IF ( :CONTROL.SELECTED_ITEMS IS NULL ) THEN

                                                :CONTROL.SELECTED_ITEMS := 'You selected the following records:'||CHR(10)||'Rec #: '||nRec||' and Emp ID: '||vDummy;

                                    ELSE

                                                :CONTROL.Selected_Items := :CONTROL.Selected_Items||CHR(10)||'Rec #: '||nRec||' and Emp ID: '||vDummy;

                                    END IF;


                        END LOOP SELECTED;

            ELSE

                        GO_Block('EMPLOYEES');             

                        Msg.Show('S','You haven''t selected any records!');

                        RAISE Form_Trigger_Failure;                      

            END IF;

END;

Note:  This is where the main work is performed and we loop through the selected record and match them with the record in the multi-record block.


  1. Lastly, we need to create the Visual Attributes that are used by the SET_SELECTED program unit.  Open the Visual Attributes node and add the following attribute with the listed properties.
    1. DEFAULT

                                                              i.      All properties are left at their default values

                                                            ii.      In other words, we don’t set any of the values as we want the default values.

    1. SELECTED

                                                              i.      Background Color:  r75g100b75

                                                            ii.      Font Weight:  Bold


That’s it!  Just compile and run the form.  The run product should look similar to the following screen shots.


Accounts Receivable-AR setups in Oracle EBS Functional Financials - Apps R12

   1. Oracle Receivables -> Setup -> System ->System Options     a. Receivable GL related setup    b. Transaction and Customer rela...