Multi-Org in simple term means the implementation of multiple business units (or Organization) under a single installation of Oracle Applications. The concept of Multi-Org will manage the operations of an enterprise which has got subsidiaries across globe under a single oracle apps window, taking appropriate care of data security and data maintenance. Below are some of the features of multiple organization functionality.
- Any number of Business Units in an Enterprise can be supported within a single installation of Oracle Application
- User can access the data corresponding to and limited to the operating unit
- Reporting can be managed at different organization levels like, Business Group, Ledger, Operating unit etc
- Transactions like Procurement, Receiving, Selling, Shipping Etc. with the same Party Can be Performed through Different Organization and can be managed internally through inter company postings
A real time organization construct in R12
Here in this example construct, CCS Company has organization structure as follows
- 1 Business Group - Which controls the organization in America and Australia
- 2 Legal Entities - one in US and one in AU
- 2 Primary Ledgers - one in US and one in AU
- 2 Operating Units - one in US and one in AU
- 3 Inventory Organizations – two in US and one in AU
How Organization Hierarchy flow in Oracle R12
Multi-Org and Multi-Org Access Control in R12 (MOAC)
Prior to R12, user has to switch between responsibilities to enter transaction and for doing other activities for a particular organization. This is very time consuming to do activities in an environment like this if you have 100 operating units. To overcome this factor, oracle has introduced a new feature in R12 which allow the user to switch the organization from the same responsibility which enables the user to access different organization and its data from a single responsibility.
To achieve the new objective, Oracle has introduced new functionality called Multi-Org Access Control (MOAC) in release 12. Following are the set up steps needs to follow for implementing the MOAC architecture for a particular application
Multi – Org Setup Steps in R12
1. Define Location
Open HRMS Manager Responsibility and navigate to Work Structure à Location
Define your location Specific Details (BG Address and time zone) for your Business Group in ‘Address Details’ tab and Shipping details in ‘Shipping Details’ tab as below.
Save the Changes
Following table will hold location details
HR_LOCATIONS_ALL
2. Define Business Group
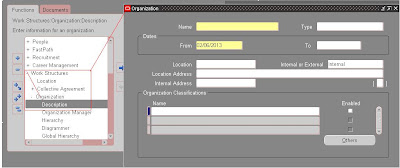
Open HRMS Manger responsibility and navigate to
Work StructureàOrganizationàDescription
Enter the business group name and assign the location created in the previous step and save the changes
Select the LOV as business group under the ‘Organization Classification’ block
Select ‘Business Group from the LOV and check ‘Enabled’ check box for the business group name and save changes
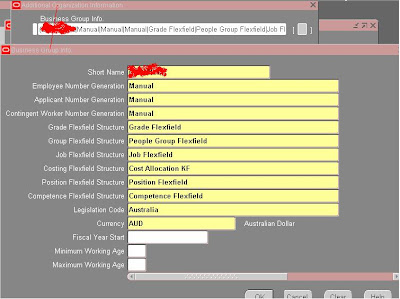
Now click on ‘Others’ button and select the Business Group info from the additional window and click OK, then another window will get opened with name ‘Additional Organizations Information’ like below
Press TAB and enter the mandatory details like below
Click OK Button, then you will be prompted to save the changes. Press on YES button. The details will get saved.
Following Table will hold business group information
HR_ALL_ORGANIZATION_UNIT
3. Create Legal Entity
As per the structure defined, we have to create the one legal entity for AU operation.
Switch the responsibility to General Ledger and navigate to the following
SetupàFinancialsàAccounting Setup ManageràAccounting Setups
In Release R12, the legal entity setup is a part of accounting setup.
Press button ‘Create Legal Entity’ and enter the Details
Click on ‘Create New Address’ to create the new address
Click ‘APPLY’ to save the changes.
Legal Entity details will be available in the following table
XLE_LE_OU_LEDGER_V
4. Define Ledger
Navigate to Accounting Setup Manager and define the New Ledger for the Legal Entity created
Ledger Details Will be available in the Following table
GL_LEDGERS
5. Create and assign Operating units to Legal Entities to Ledger
In this step we will assign operating unit to Legal Entity. This will be defining from General Ledger responsibility
Navigate to Setup –> Financials –> Accounting Setup Manager –> Accounting Setups
In the Ledger Definition window, enter the Ledger name and press GO button. Once the search finishes and resulted with the Ledger name, Click on ‘Update Accounting Options’ button
Then Assign the Legal Entity to the ledger by clicking ‘Add Legal Entity’ button
Search for the legal entity created in our previous step and click on apply button to save the changes. Now the legal Entity is assigned to Ledger
Now click on Update button next to the operating unit setup option
Click on Add operating unit
Enter the details. Assign the business group and legal entity created from the above steps to the operating unit and click on apply button
After completing all ledger option press ‘Complete’ button to complete the accounting setup
6. Create Inventory Information
Switch to Human Resource responsibility and Navigate to the following
Work Structure àOrganizationàDescription
Click on New Button to create the new Inventory Organization
From the Organization Classifications Frame, select the option Inventory Organization from the LOV.
Press OK to save the Details
No click on ‘Others’ button and select ‘Accounting Information’ option. A small window will open, Press TAB to enter the details in this window
Assign the following to the inventory organization we have created in our previous steps
Primary Ledger
Legal Entity
Operating Unit
Click OK and Click Yes to save the changes
Again Click ‘Others’ button and select the ‘Inventory Information’ from the list
Then add all inventory details and save the changes.
Once the setup is done, run the following reports/programs to use the operating unit we created
In order to use the operating unit, run the following program and it should be run for all the new operating unit structure
Switch the responsibility to ‘System Administrator’
Program :- Replicate Seed Data
Parameter: - <Operating Unit>
Run the following program
Multi-Org Setup Validation Report
Now the operating units and other related setups are ready to use. Now we have to think how we can enable the multiple organization can be enabled from a single responsibility.
Enabling Multi – Org Access Control (MOAC)
MOAC is implemented in R12 to allow the users to submit requests and access data of different operating units in a single responsibility. This functionality can be done by setting the SECURITY PROFILES under HRMS module
There are 2 security profiles:
- SECURITY PROFILE: is used for the selection of operating units from the same business group
- GLOBAL SECURITY PROFILE: is used for the selection of operating units from the different business group
Set up of Multi-Org Access Control:
- Setup Security Profile in HRMS
Switch the responsibility to Human resource
Navigate to the following
Security àProfile
Select the name for the profile and attach the business group created
In order to have access to the security profile we created, we need to create a responsibility and assign this profile option to the responsibility
Switch to System Administrator responsibility and navigate to the following
SecurityàResponsibilityàDefine
Once the responsibility is defined, assign the new security profile option to the responsibility by navigating the following
Profile à System
This is it!!!
We have done with the setup of Multi-Org. This is a key functionality in Oracle R12 which is serving as the stepping stone to Oracle Multi-Org implementation.
Following SQL query can give the relation between Ledger, Legal entity and Operating Units in Oracle Apps R12
SELECT hrl.country, hroutl_bg.NAME bg, hroutl_bg.organization_id,
lep.legal_entity_id, lep.NAME legal_entity,
hroutl_ou.NAME ou_name, hroutl_ou.organization_id org_id,
hrl.location_id,
hrl.location_code,
glev.FLEX_SEGMENT_VALUE
FROM xle_entity_profiles lep,
xle_registrations reg,
hr_locations_all hrl,
hz_parties hzp,
fnd_territories_vl ter,
hr_operating_units hro,
hr_all_organization_units_tl hroutl_bg,
hr_all_organization_units_tl hroutl_ou,
hr_organization_units gloperatingunitseo,
gl_legal_entities_bsvs glev
WHERE lep.transacting_entity_flag = 'Y'
AND lep.party_id = hzp.party_id
AND lep.legal_entity_id = reg.source_id
AND reg.source_table = 'XLE_ENTITY_PROFILES'
AND hrl.location_id = reg.location_id
AND reg.identifying_flag = 'Y'
AND ter.territory_code = hrl.country
AND lep.legal_entity_id = hro.default_legal_context_id
AND gloperatingunitseo.organization_id = hro.organization_id
AND hroutl_bg.organization_id = hro.business_group_id
AND hroutl_ou.organization_id = hro.organization_id
AND glev.legal_entity_id = lep.legal_entity_id


